
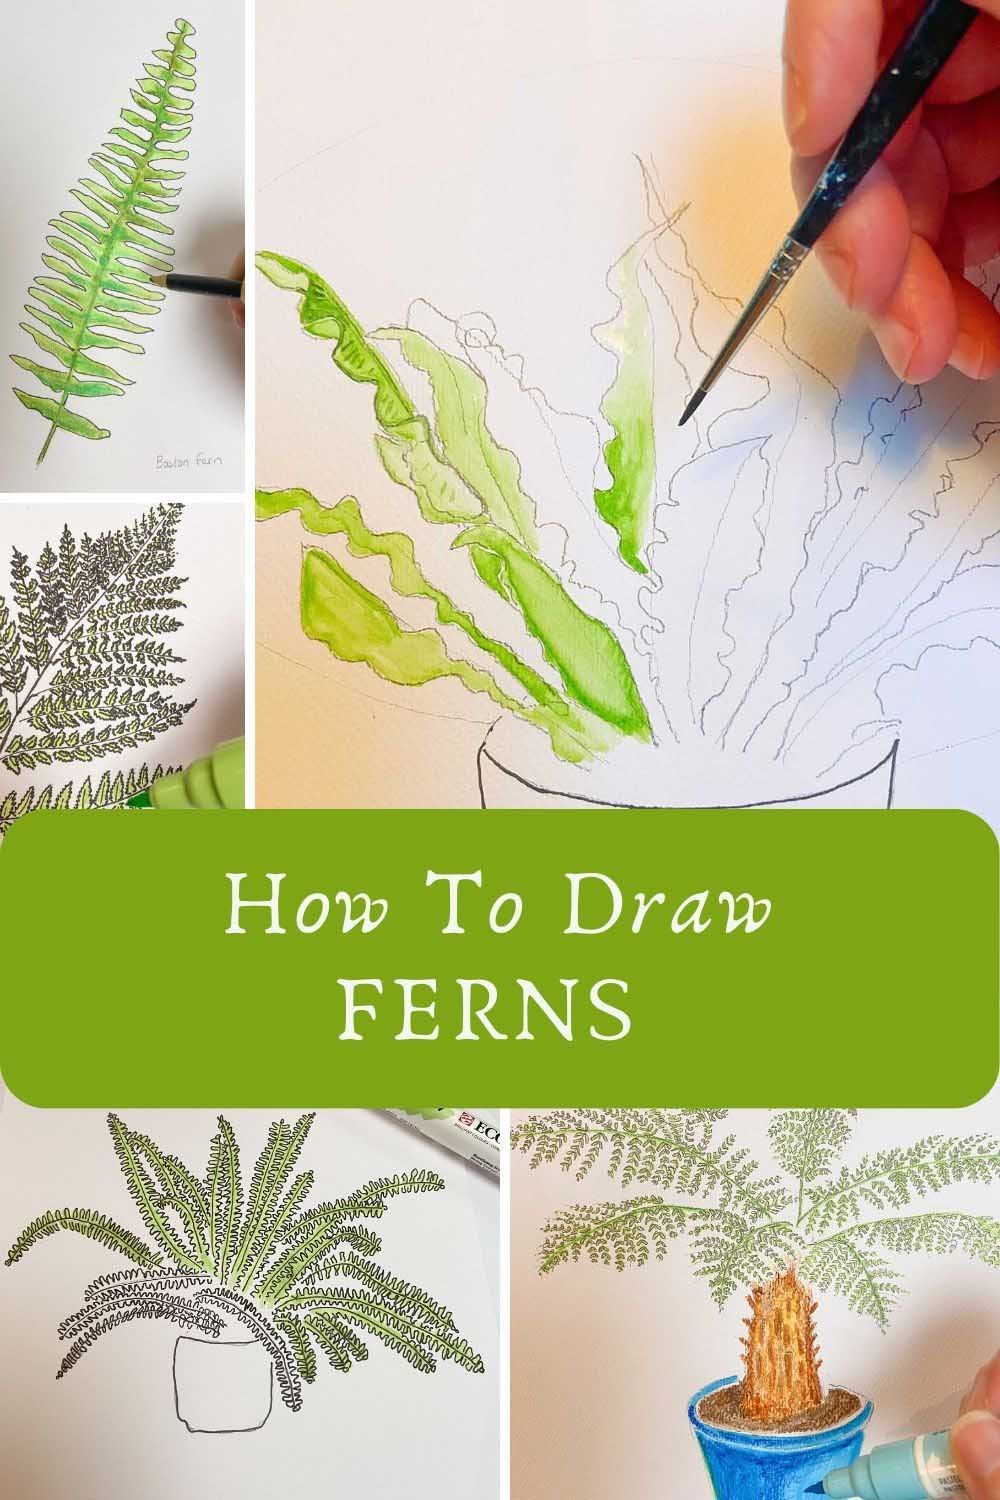
Inside: A guide on how to draw ferns. From the basic black outline to adding colour, enhance your drawing skills with high-quality images and detailed diagrams of fern plants.
I’ve always been fascinated by ferns. Their elegance and the rich history they carry have made them a favourite among plant lovers and novice artists alike.
This love for ferns isn’t new—it echoes the Victorian era’s “Pteridomania,” when collecting ferns was all the rage. There’s something special about ferns that has continued to capture our imagination through the ages.
Recently, I found myself wandering the quaint streets of Lyme Regis on the Jurassic Coast. There, amidst the charm of narrow lanes and cosy cottages, I stumbled upon a small dinosaur museum that boasted a stunning Jurassic garden.
These shade gardens were a lush sanctuary filled with the majestic Dicksonia Antarctica or fern trees, transporting me to a prehistoric world. Inspired by this encounter, I felt a renewed urge to bring the beauty of ferns to life on paper.
The Joy of Drawing Ferns
Learning how to draw fern leaves is as addictive as the act of collecting them once was. The intricate leaves of species like Dicksonia Antarctica present a delightful challenge, akin to piecing together a 1000-piece puzzle where every piece is known. Yet, the joy lies in finding their perfect place.
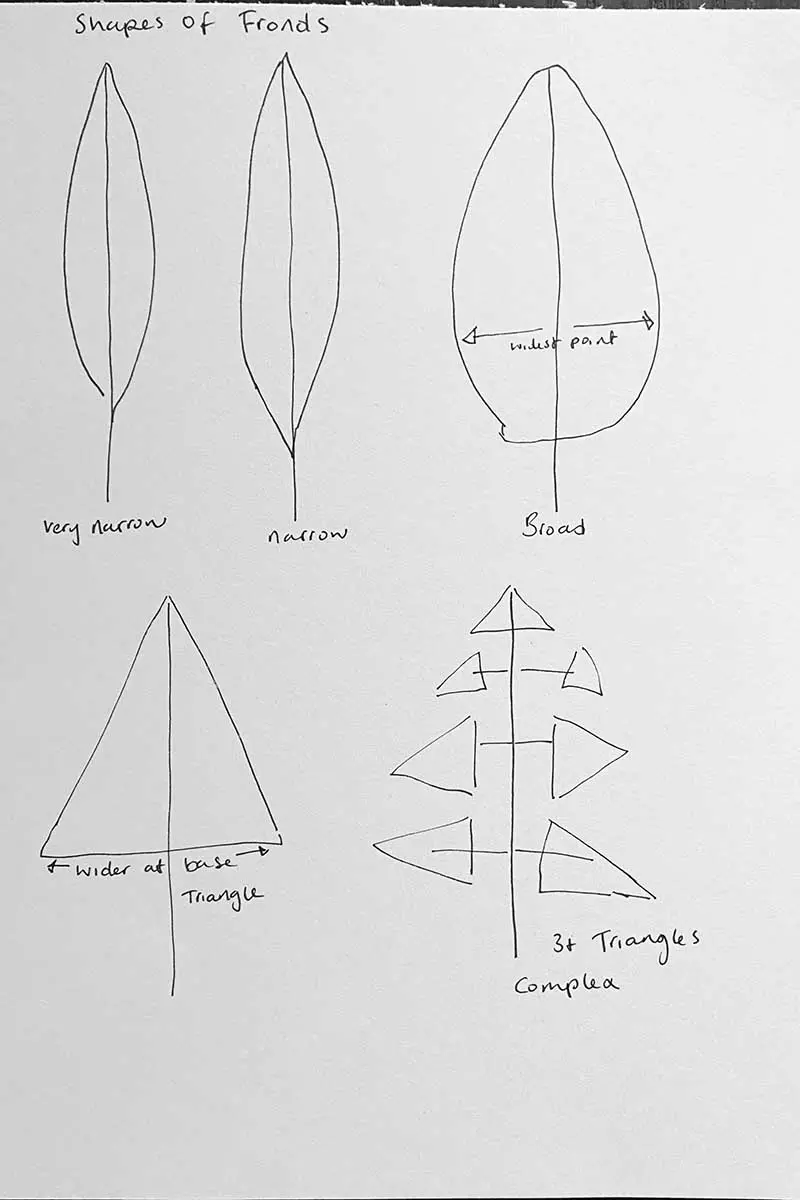
To start drawing a fern, focus on its fronds—the leaves are helpful. Each fern has its unique structure, but don’t worry; we’ll keep the plant tutorials simple and suitable for all drawing skills.
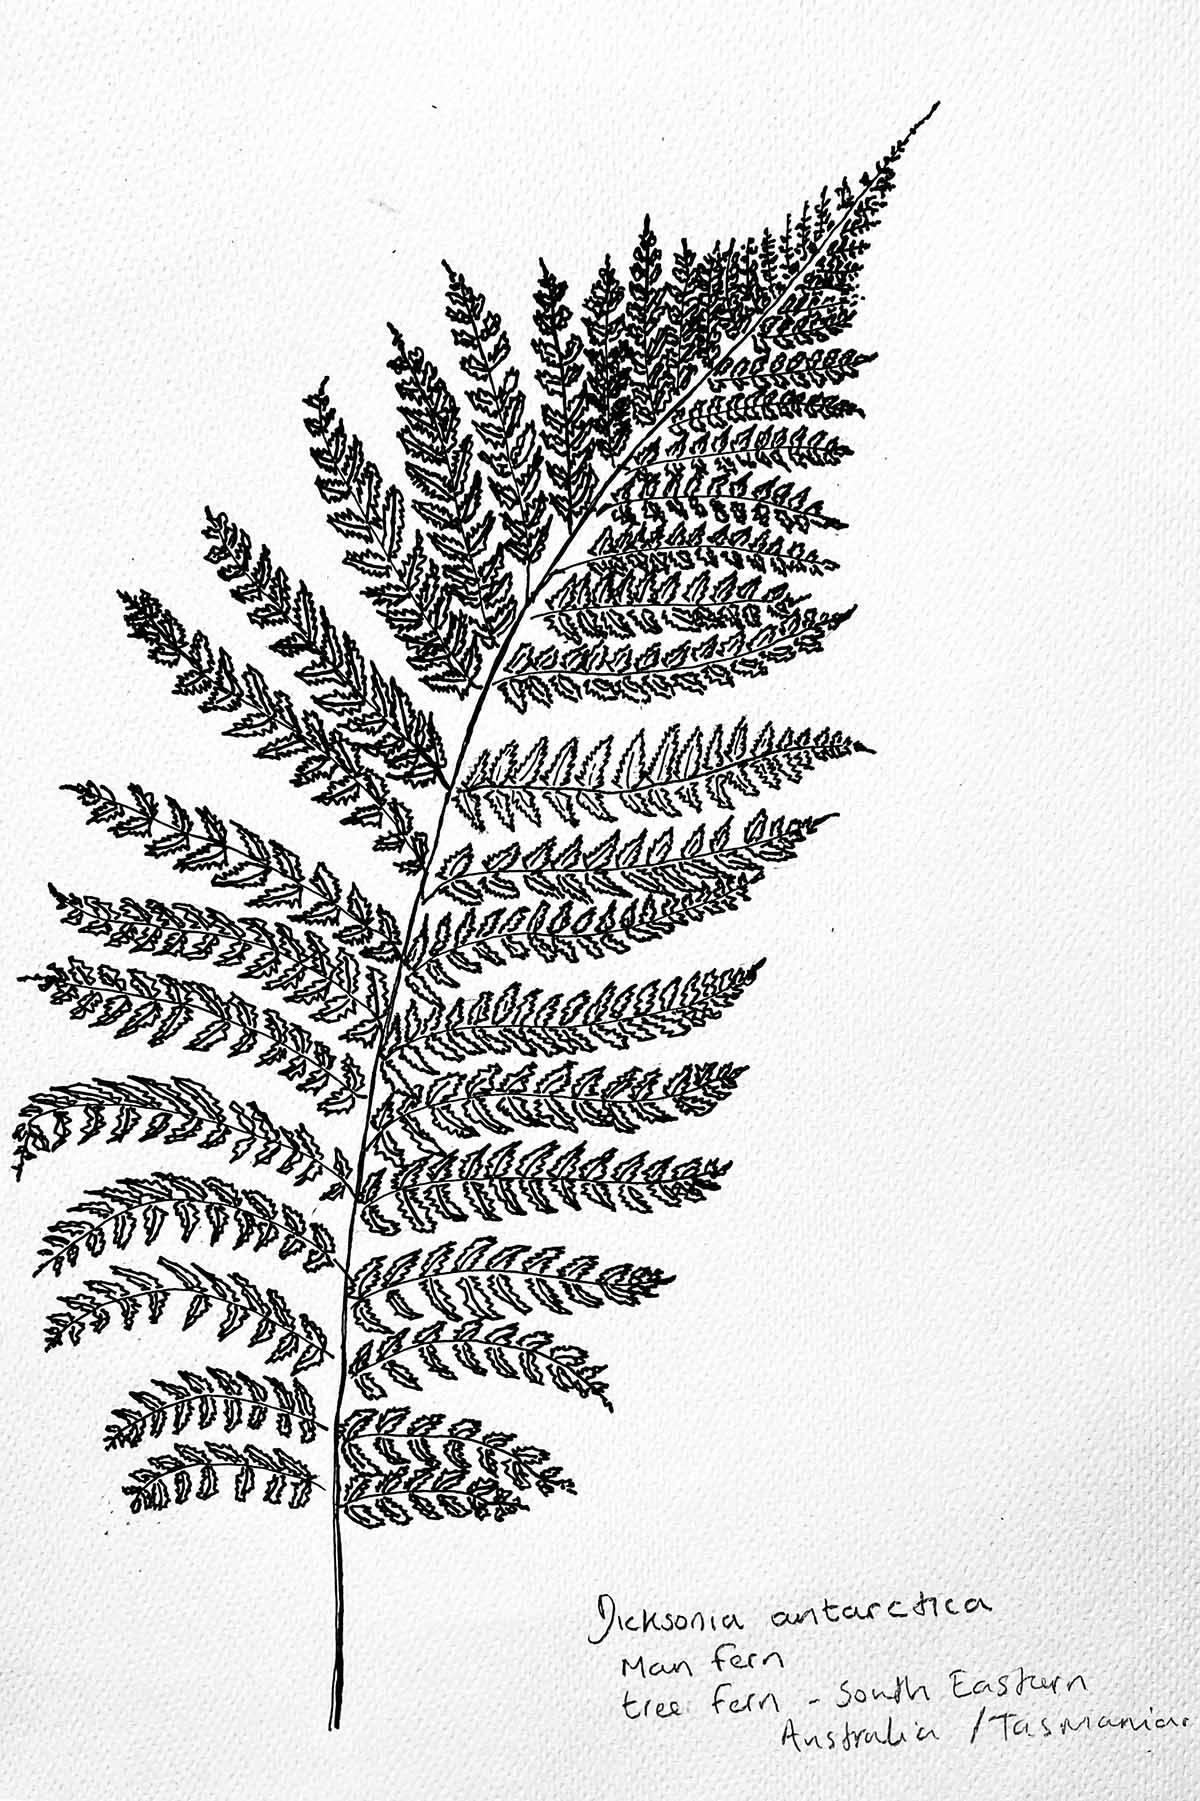
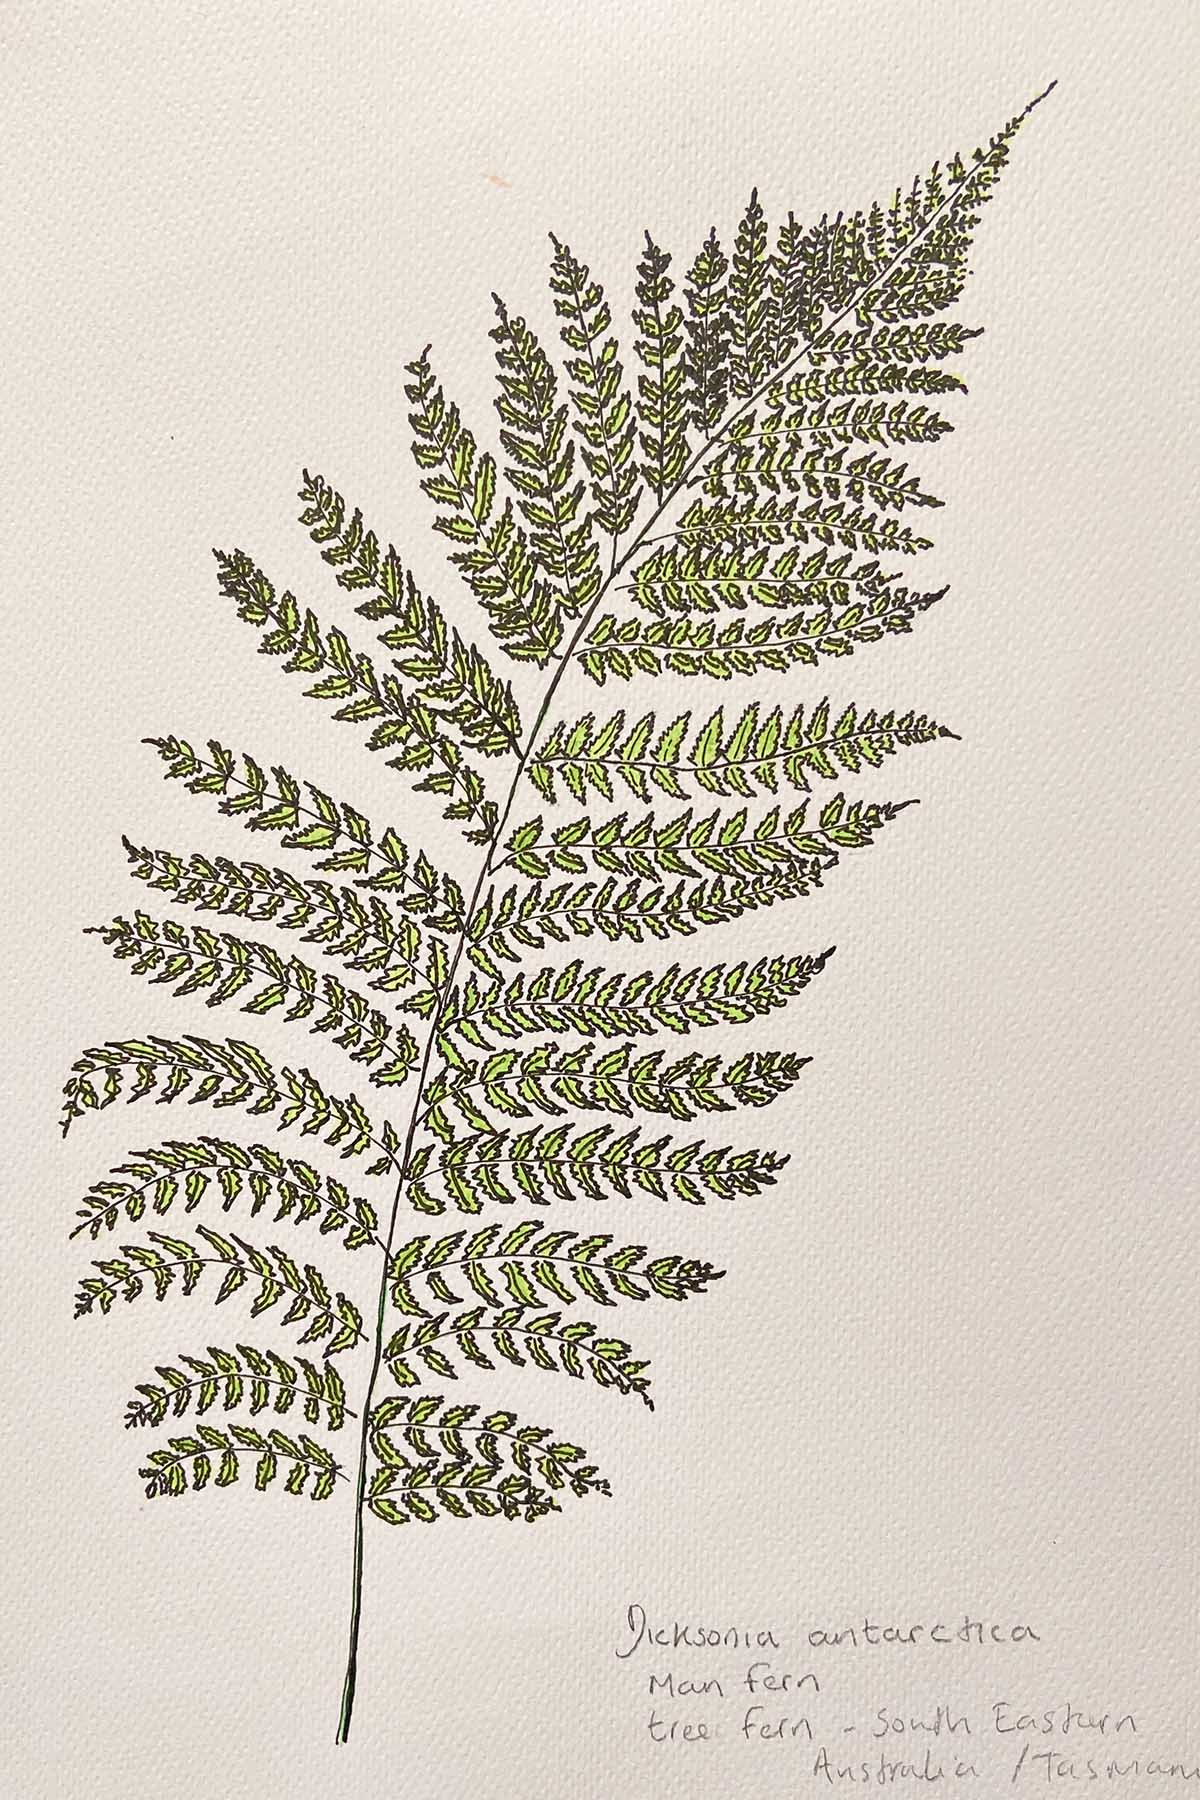
Whether the frond is narrow, broad, or triangular, recognizing its shape is the first step. For instance, the fronds of Dicksonia Antarctica are wide in the middle and taper at both ends, featuring deep divisions that may seem daunting but follow a beautiful, repetitive pattern.
In this guide, we’ll explore the art of drawing ferns in a way that’s fun and accessible. Whether you’re a beginner or looking to refine your skills, I’ll share tips and tricks to help you create a stunning fern drawing. So, grab your pencils, and let’s embark on this artistic journey together, discovering the beauty of ferns one stroke at a time.
Diagram of Fern Plant Fronds

For high-quality images of ferns and palm trees for free download check out these posts on Pictureboxblue.
How To Draw A Tree Fern: Dicksonia Antarctica
Dicksonia Antarctica, also known as the Tasmanian tree fern, is a slow-growing fern native to eastern Australia. It features a thick trunk topped with a lush canopy of dark green fronds that can reach 2-3 meters long. This fern thrives in moist, shaded environments, making it a popular choice for gardeners looking to add a prehistoric or tropical feel to their landscapes.
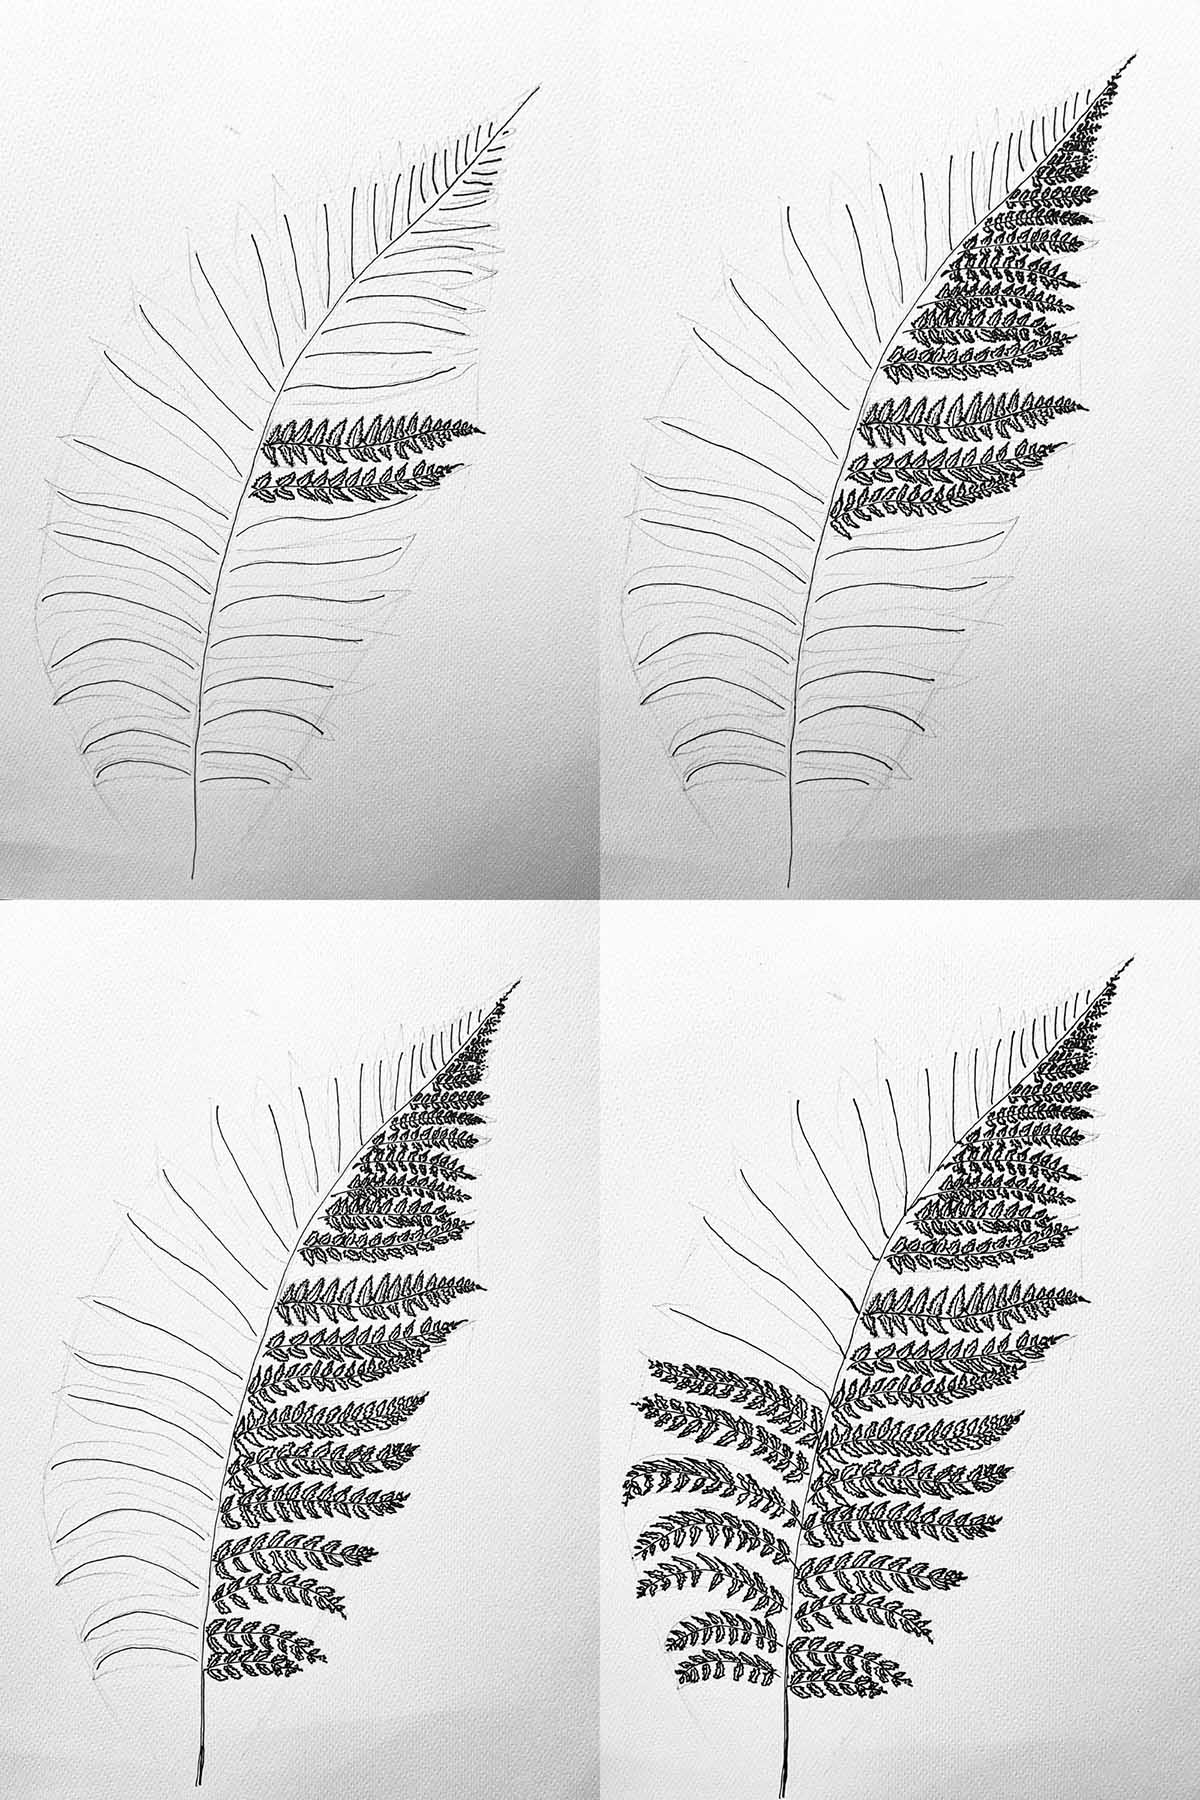
Step 1: Lightly in pencil, draw the frond shape (wide in the middle, tapered at both ends). Sketch any angles you wish, some Fronds flow from the centre, and some are more upright. Draw the stem in the centre of your frond.
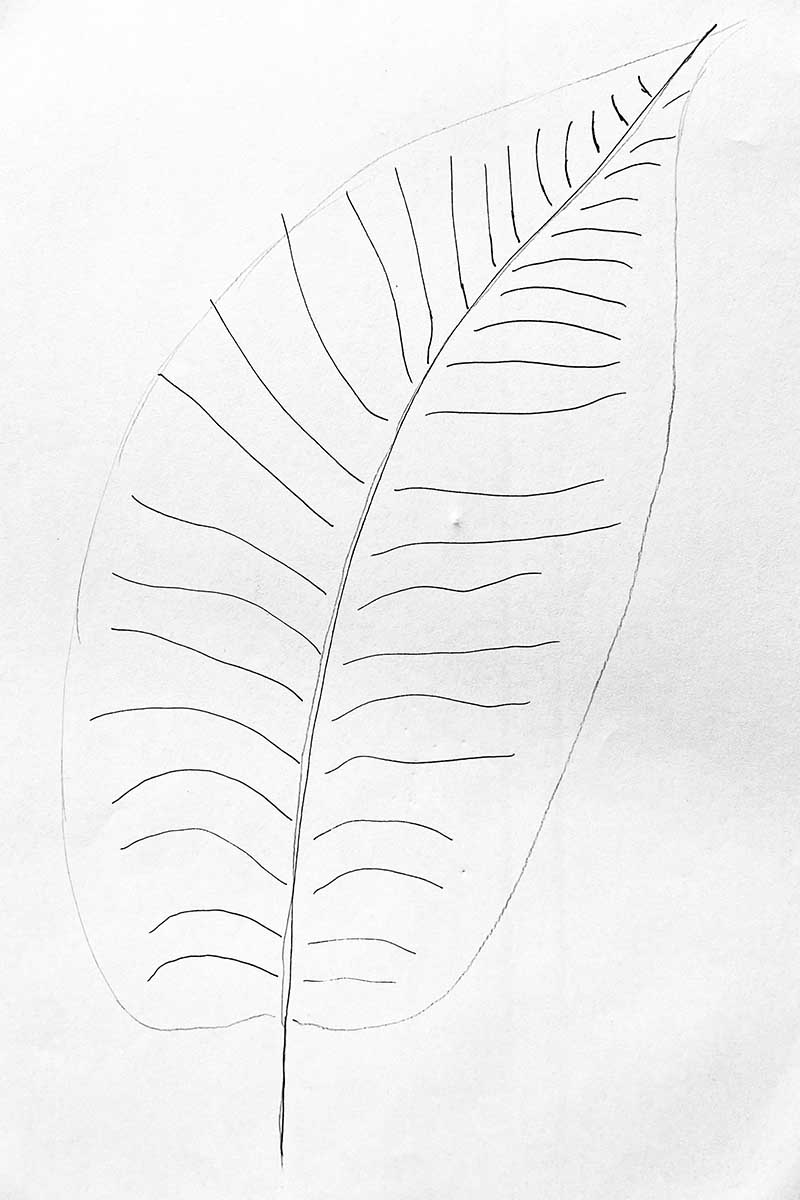
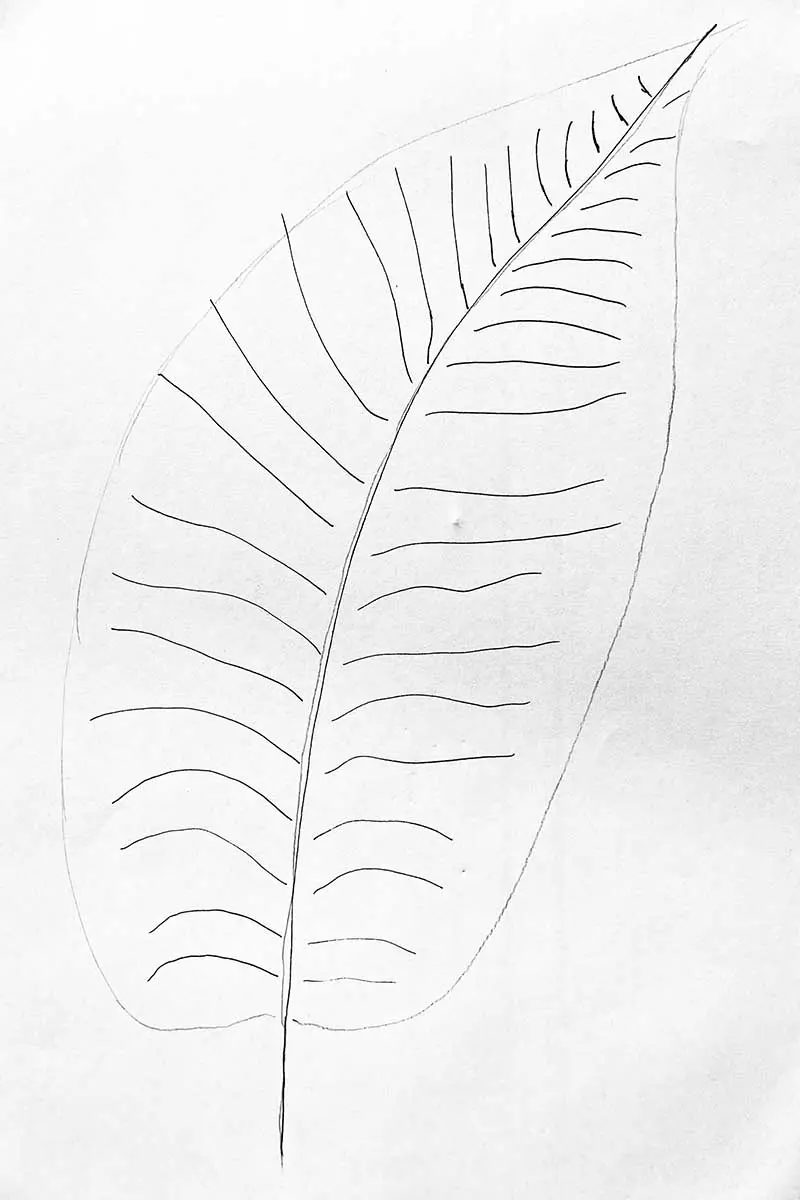
Step 2: Add in the bones of the fern. It’s like fish bones or the structure of a feather (or leaf vein). Make sure that the leaves are symmetrical. The pencil line outline drawn in Step 1 guides this.
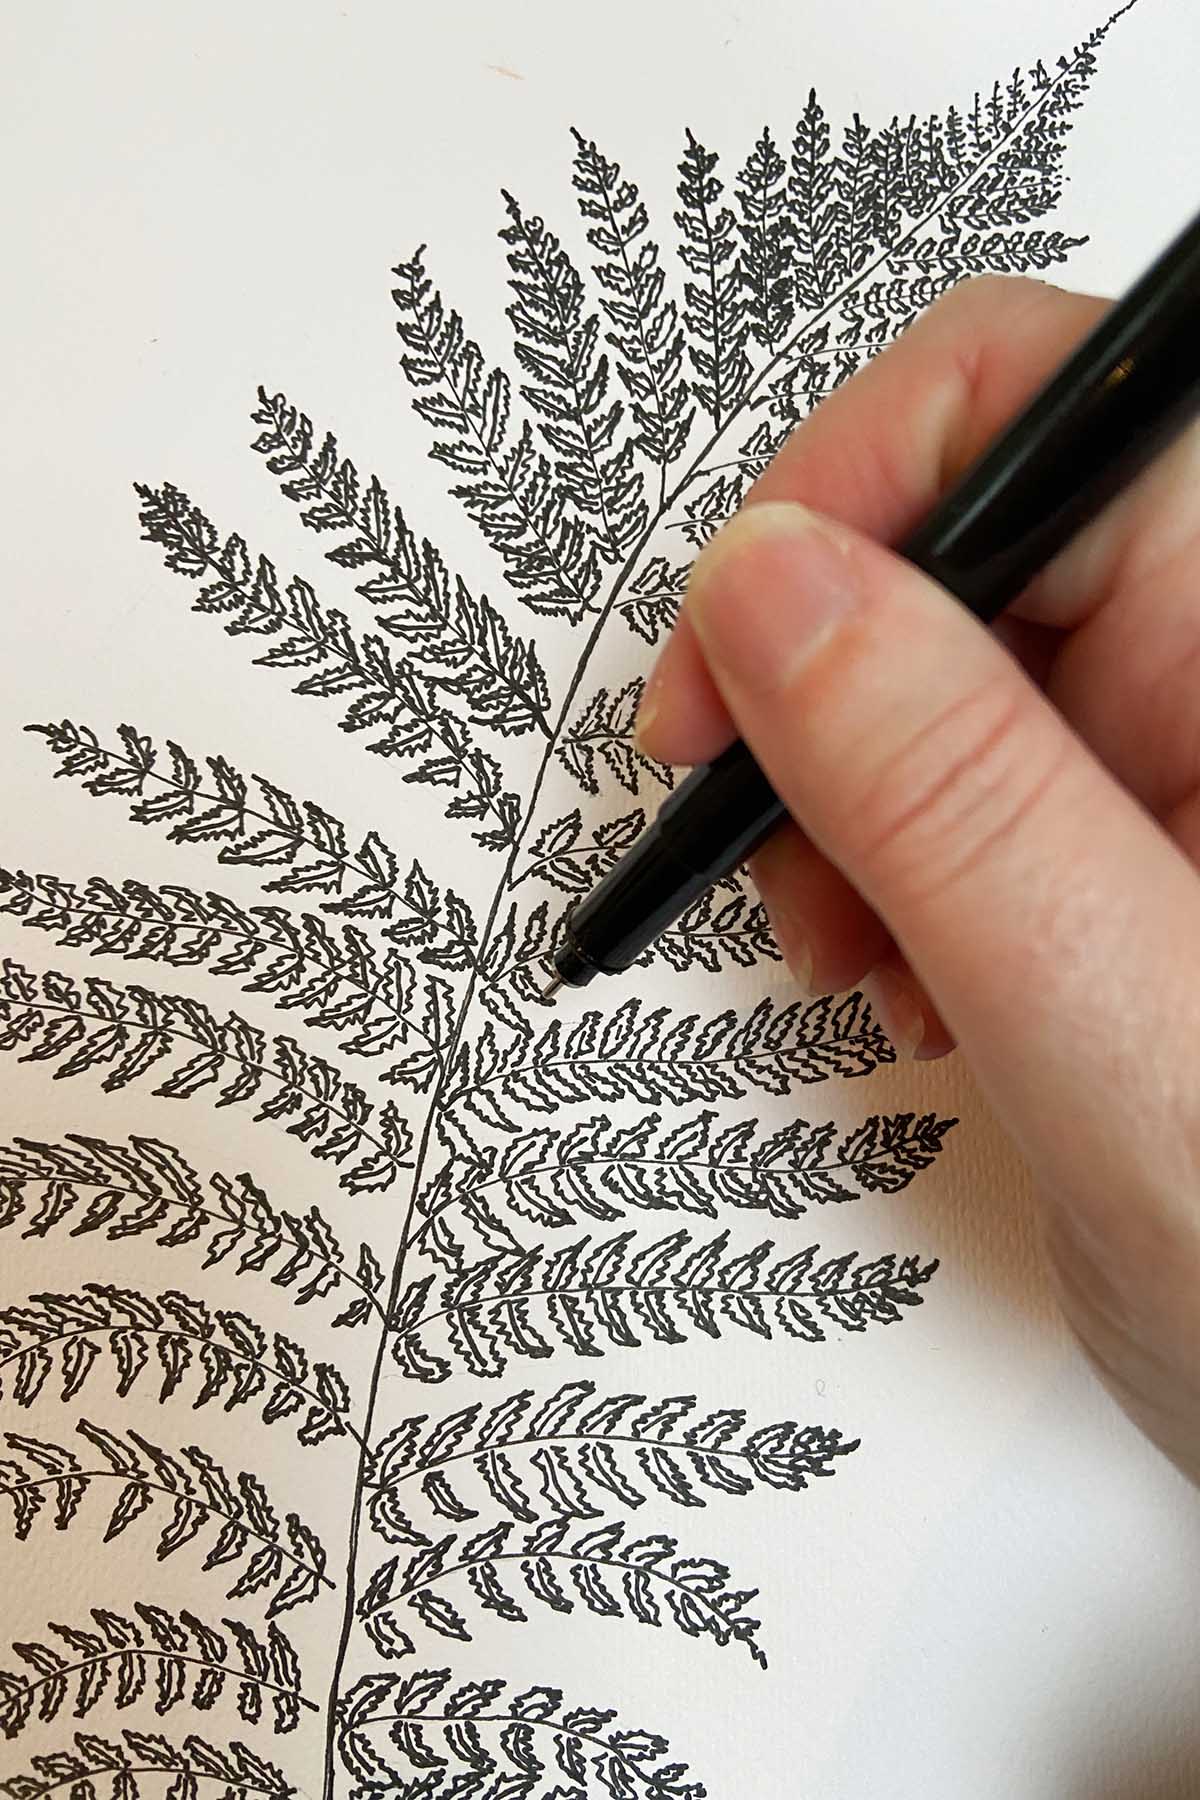
Step 3: Start during the pinna and the pinnules. These are the leaves that come from the centre stalk.
What type of fern you draw will depend on how divided your frond is and how much detail you need. For instance, a bird’s nest fern or Harts’s tongue fern is simple, and its frond is not divided. Drawing a light shape in pencil around each pinna also helps guide your drawing the same way it did for the main shape of the frond.
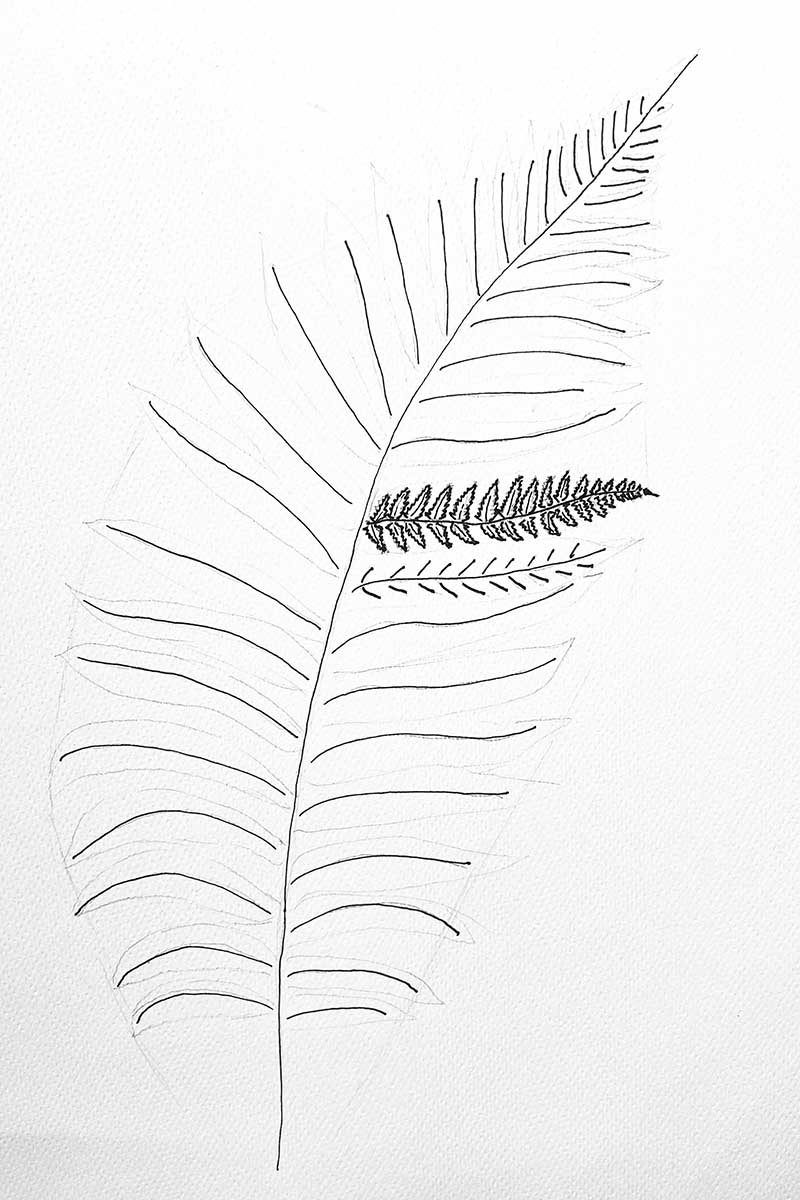

Sep 4: This is the fun bit. If you are drawing a divided fern with complex details, put on some music and relax. This part is time-consuming but rewarding. I found it quite therapeutic to build it up step by step.


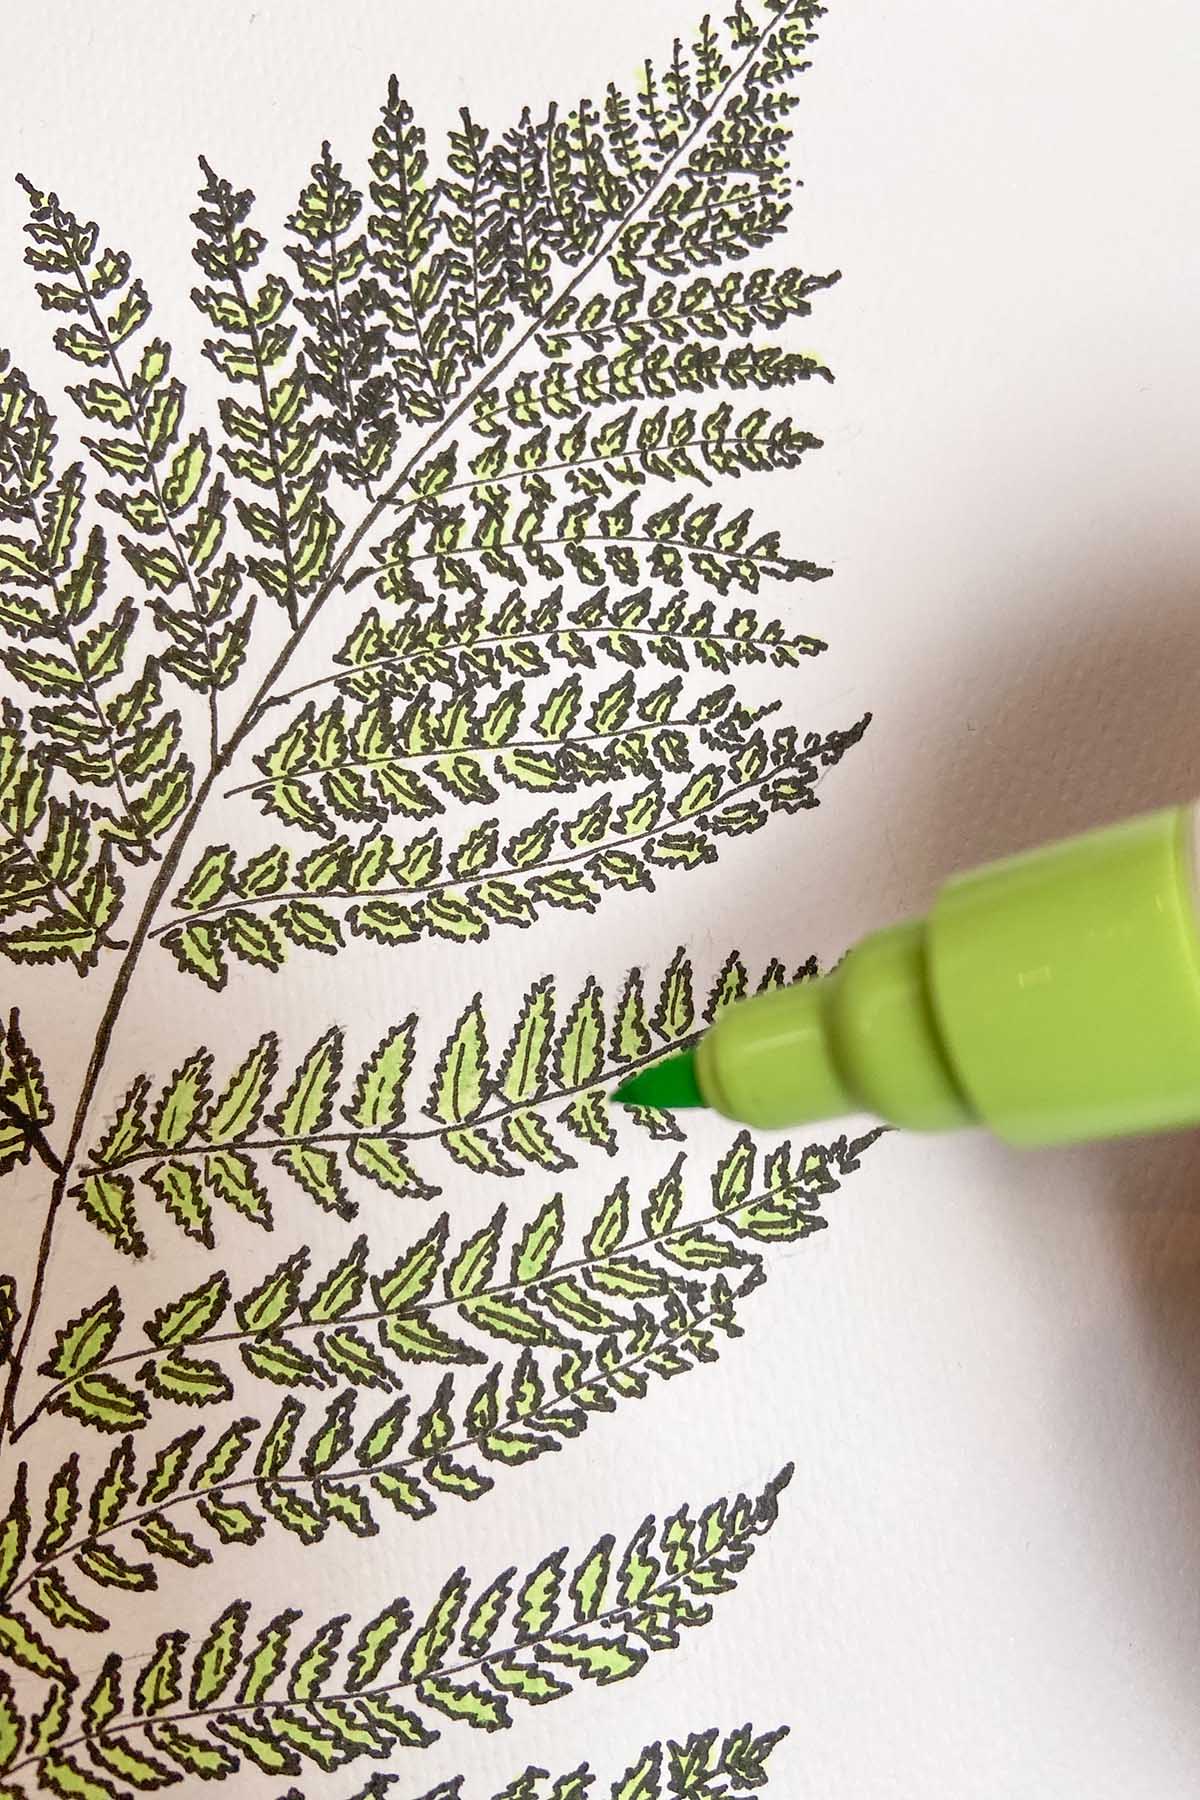
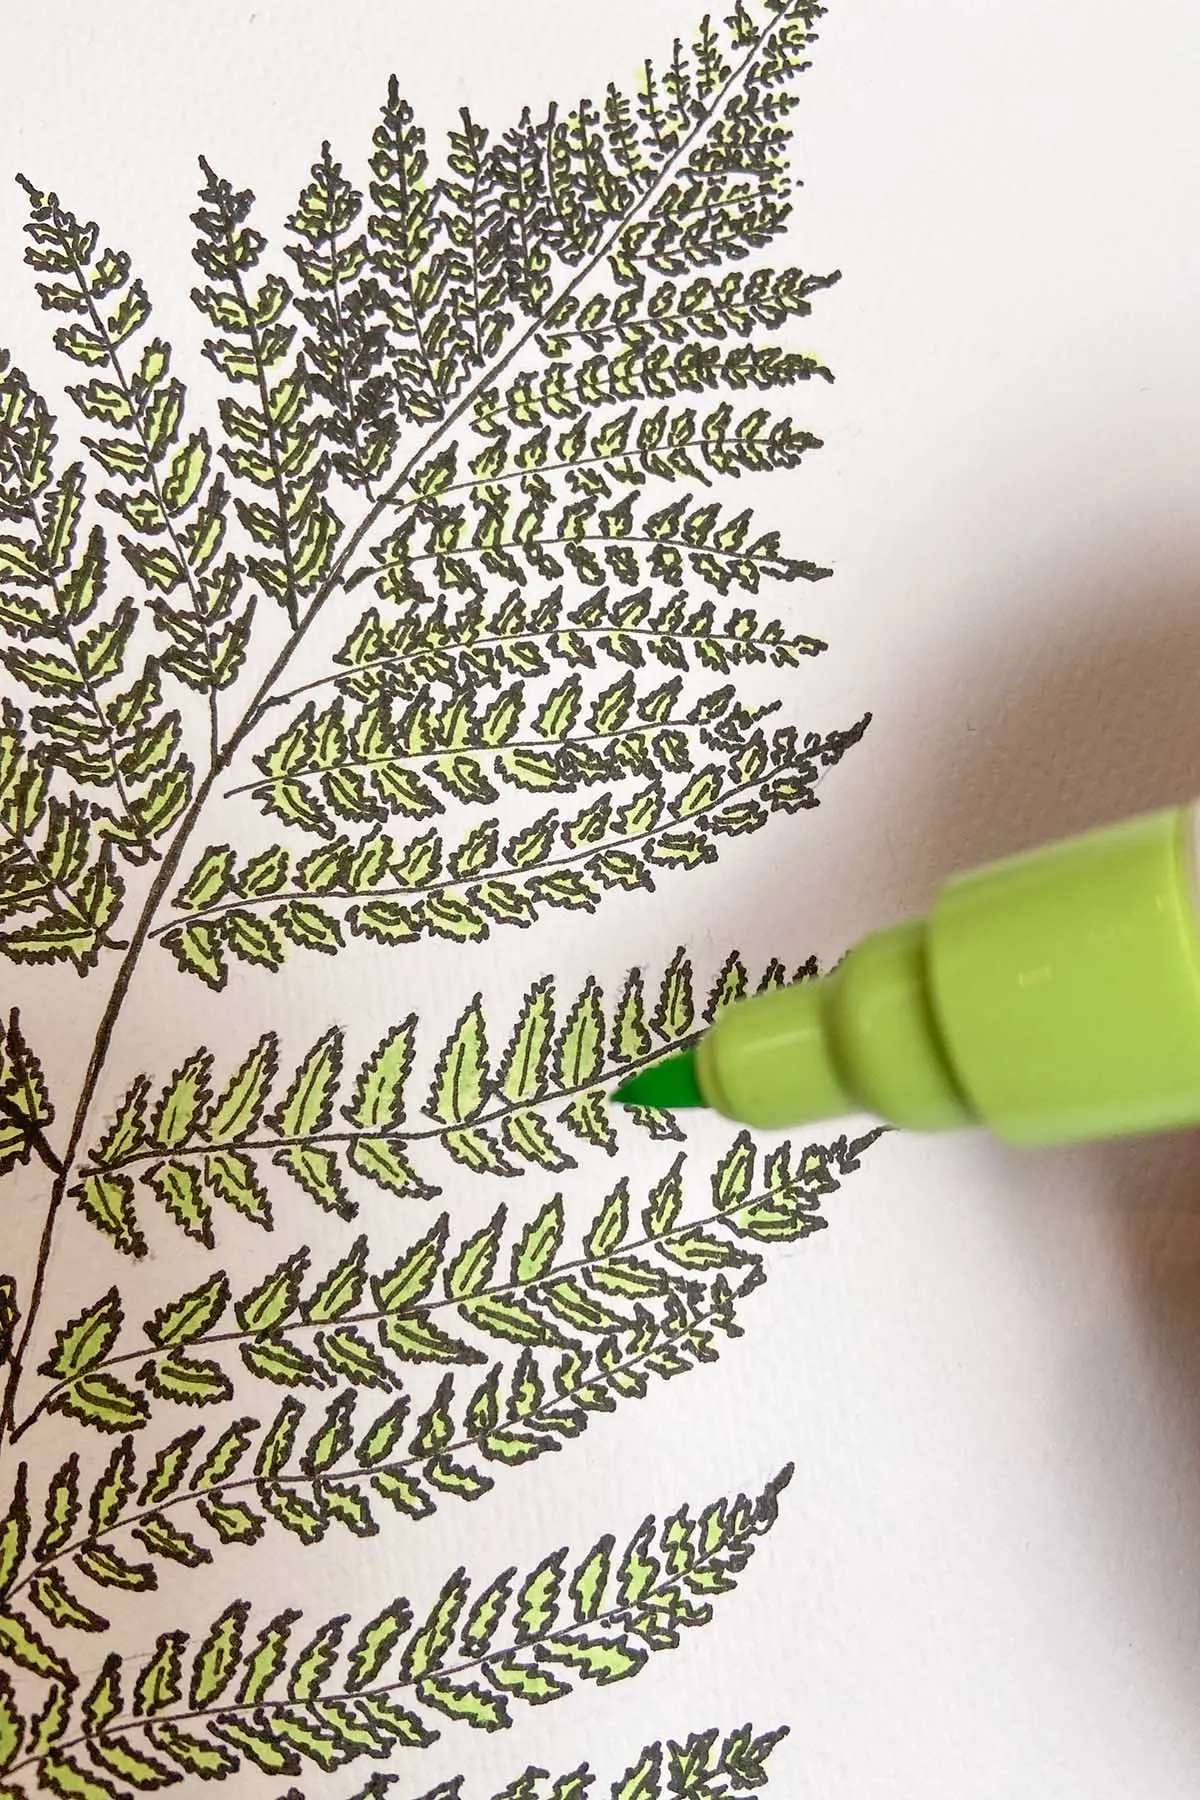
Step 5: Add colour: I like the line drawing in pen as it showed the structure of the frond, so I just used a brush pen to add some simple green colour. Coloured pencils or pens would work best, as adding paint to all the small details is tricky.
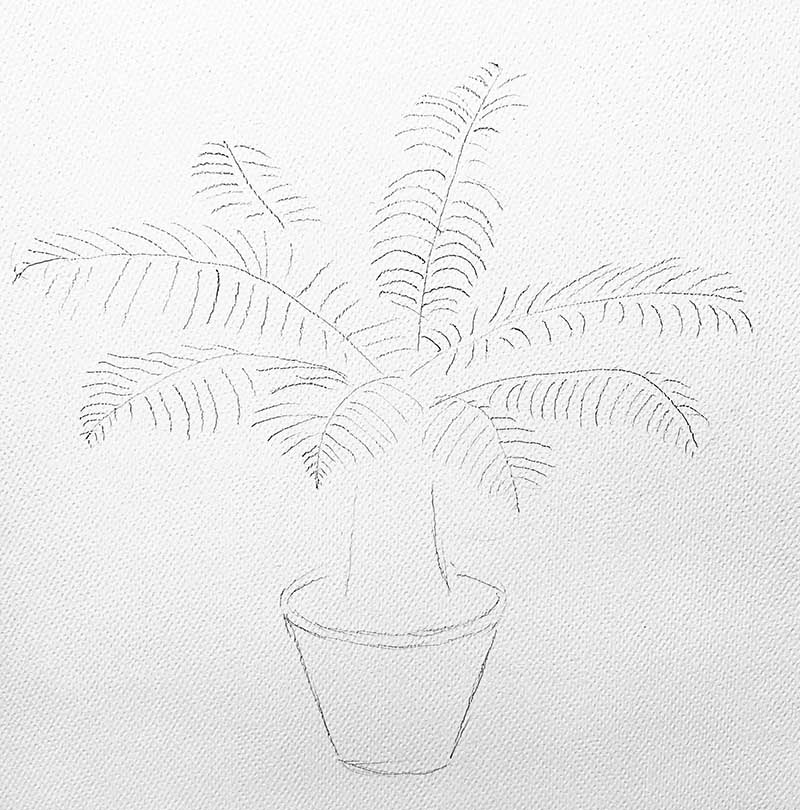
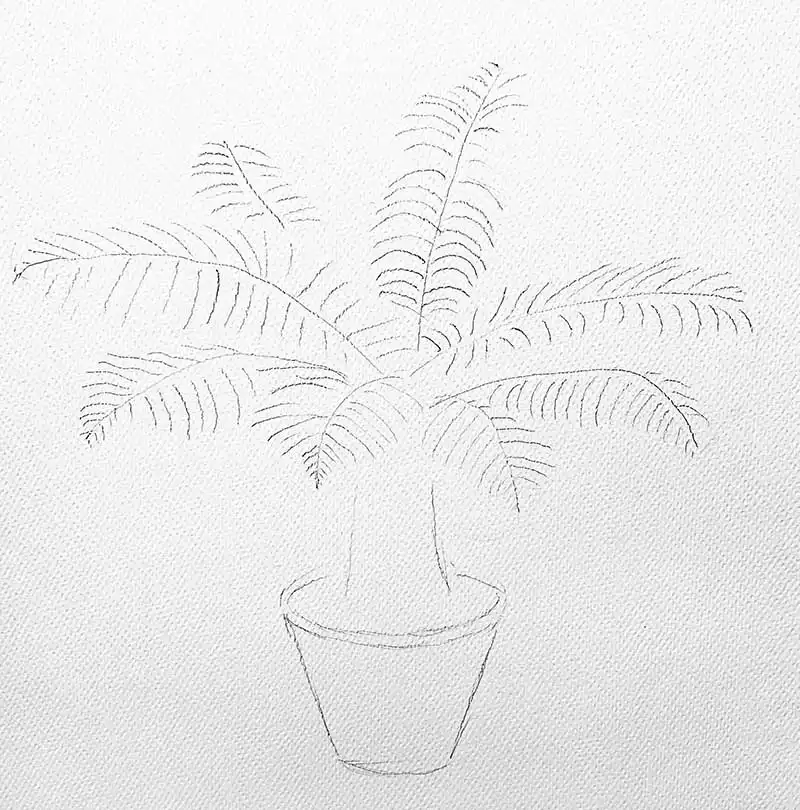
Drawing A Potted Tree Fern
Now that you know how to draw a frond, you’re ready for the next step. Use this skill to illustrate the entire tree fern.
Step 1: Start by drawing your pot, your trunk, and the skeleton of your frond leaves. Draw the skeletons of the fronds coming out of the centre of your trunk as shown.
Step 2: Draw the details of your trunk. The trunk of the tree frond is the dead organic matter from the previous year’s growth, which is why it has short stalks. Add the details of the Pinna and the pinnules to your fronds.
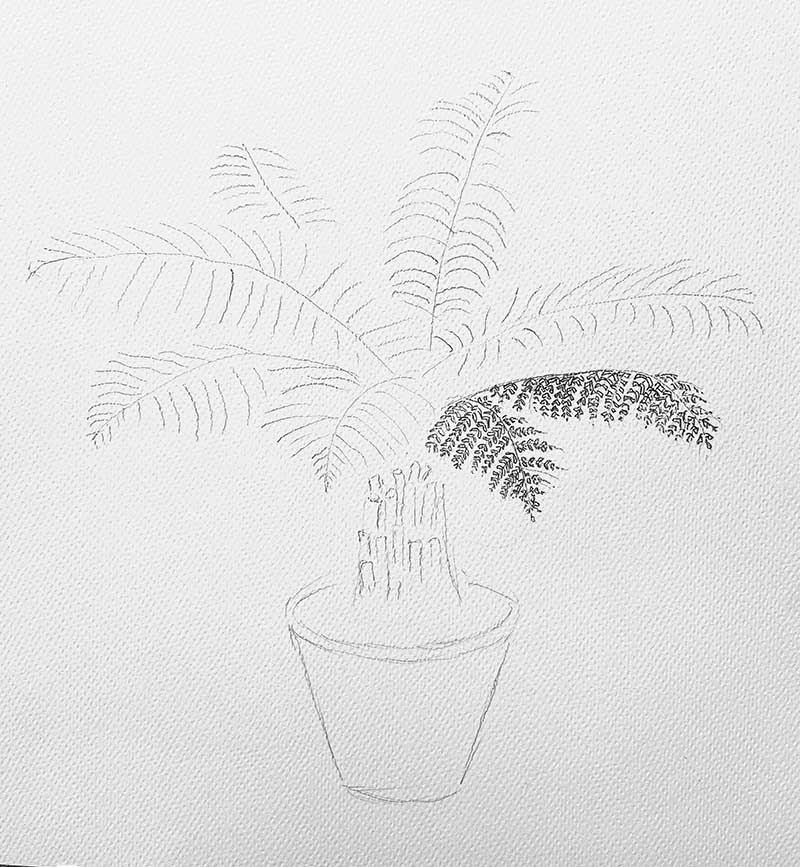

Step 3: Gradually build your picture by adding the pinna and pinnules. This is time-consuming but addictive!


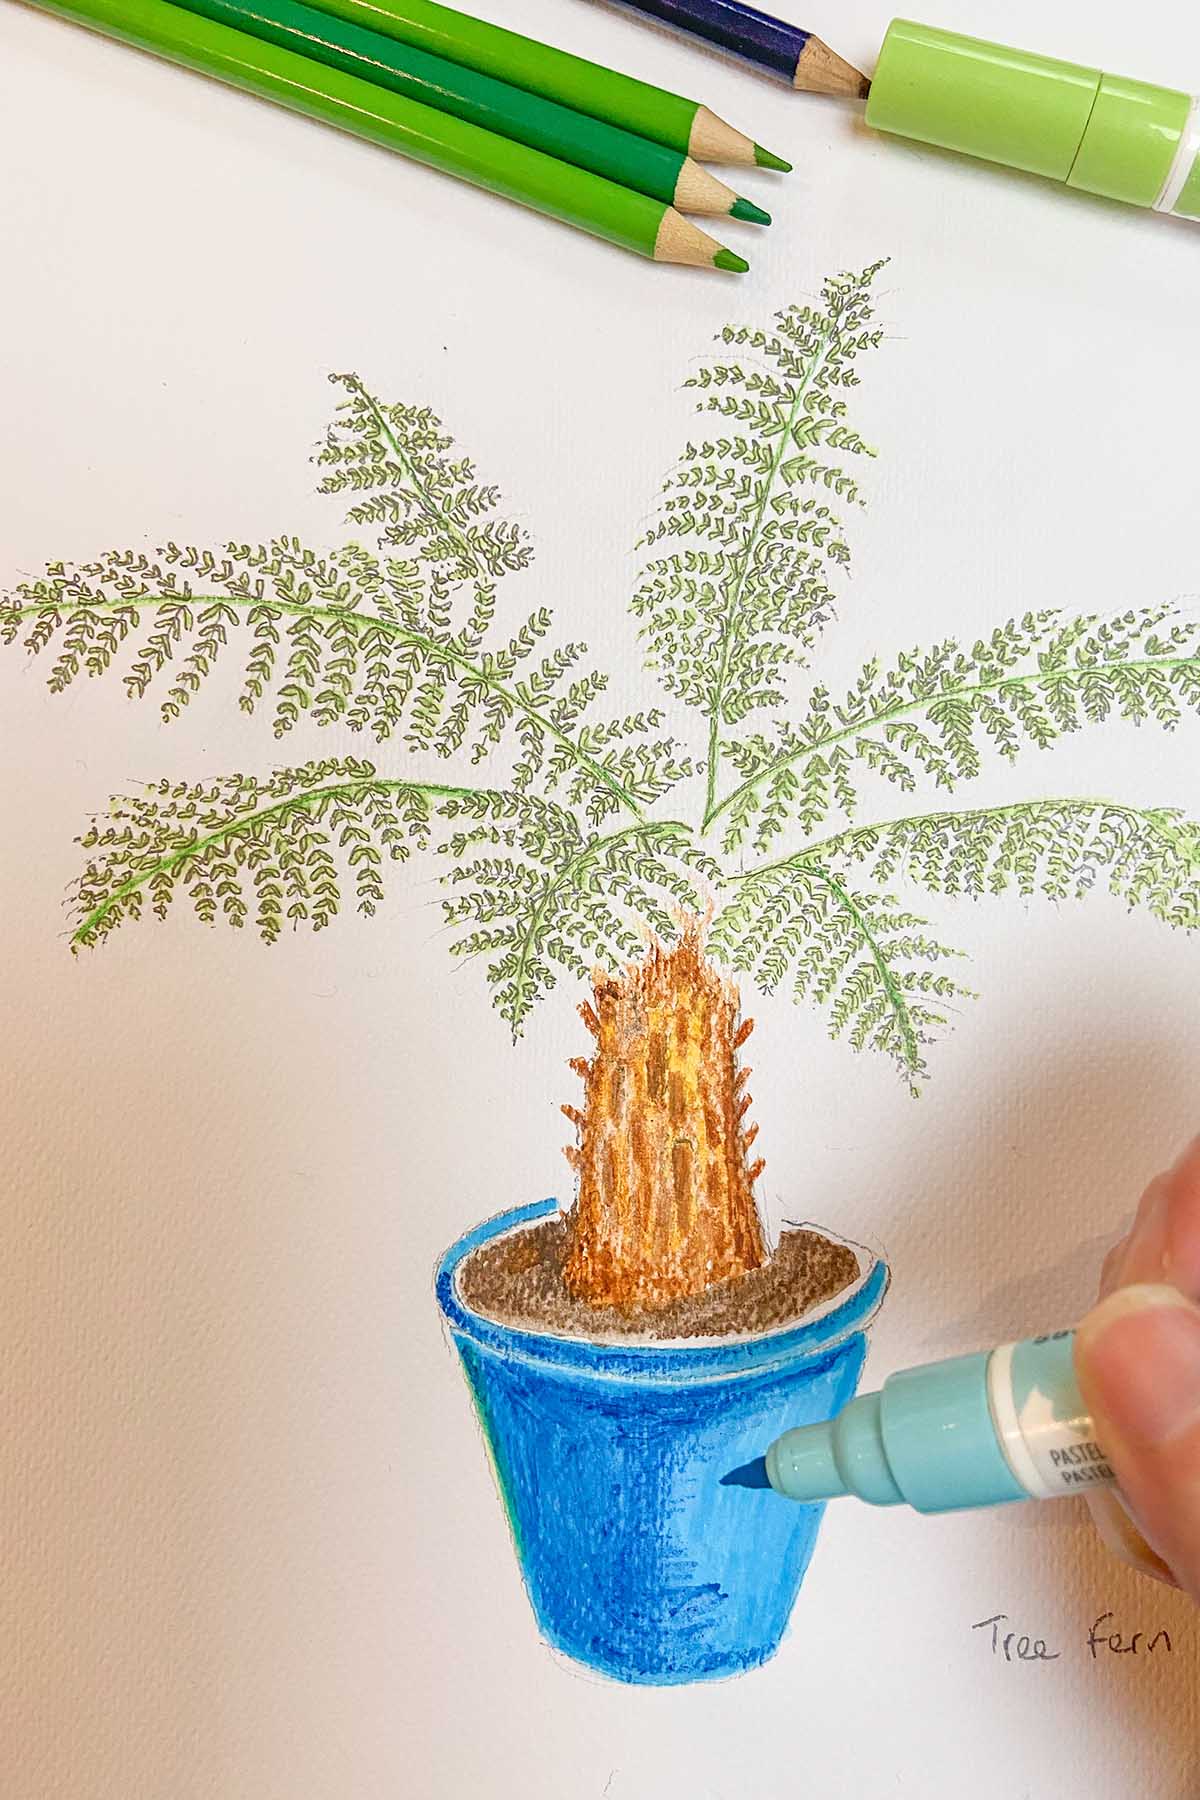
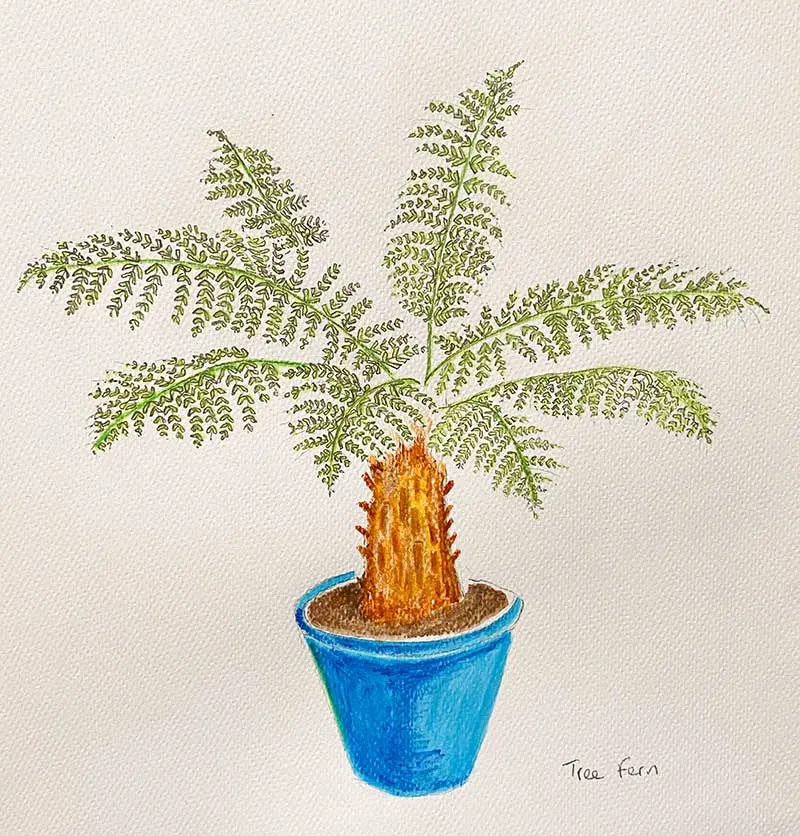
Step 4: Add colour – given the intricate details of this image, I opted for a brush pen and watercolour pencils for precision. However, explore and experiment with any technique that suits you.


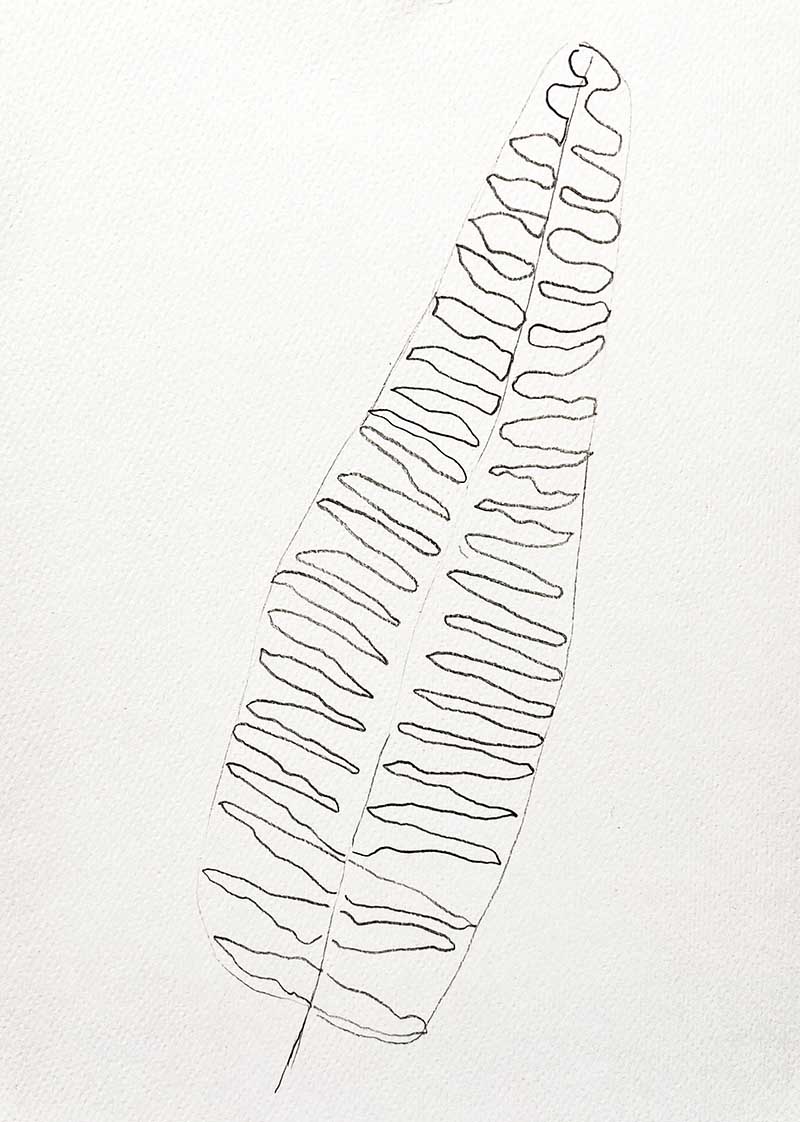
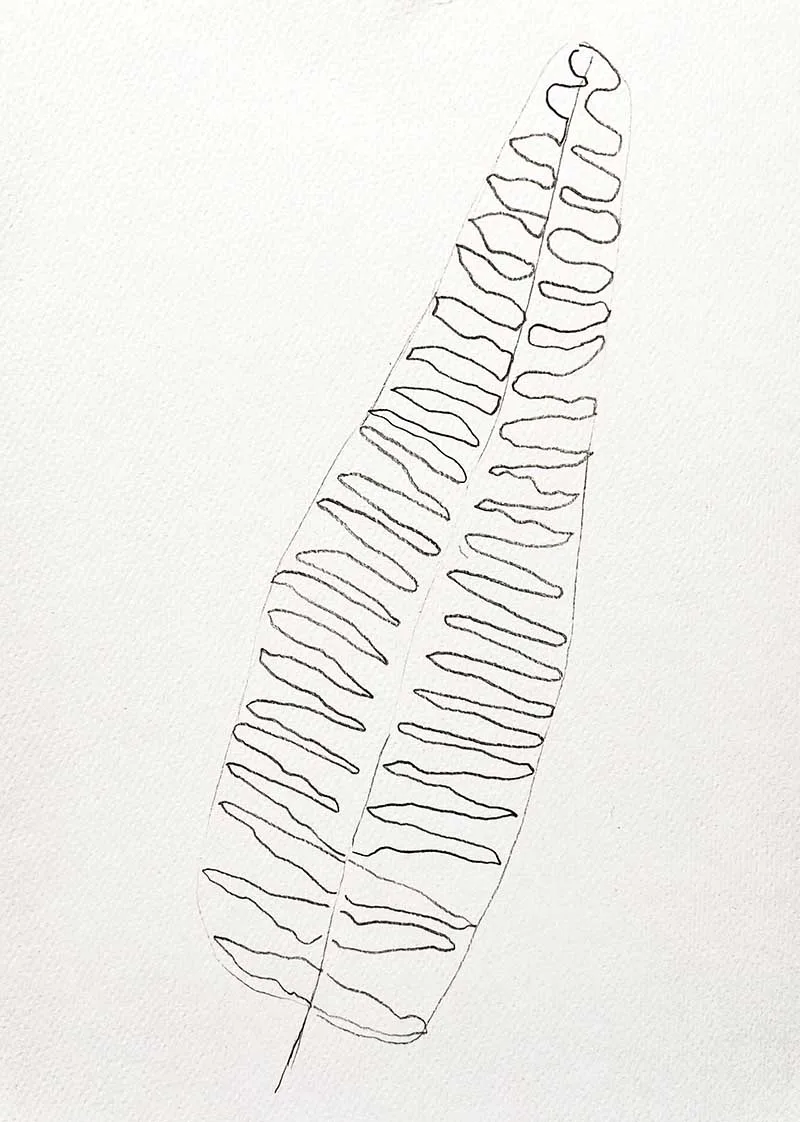
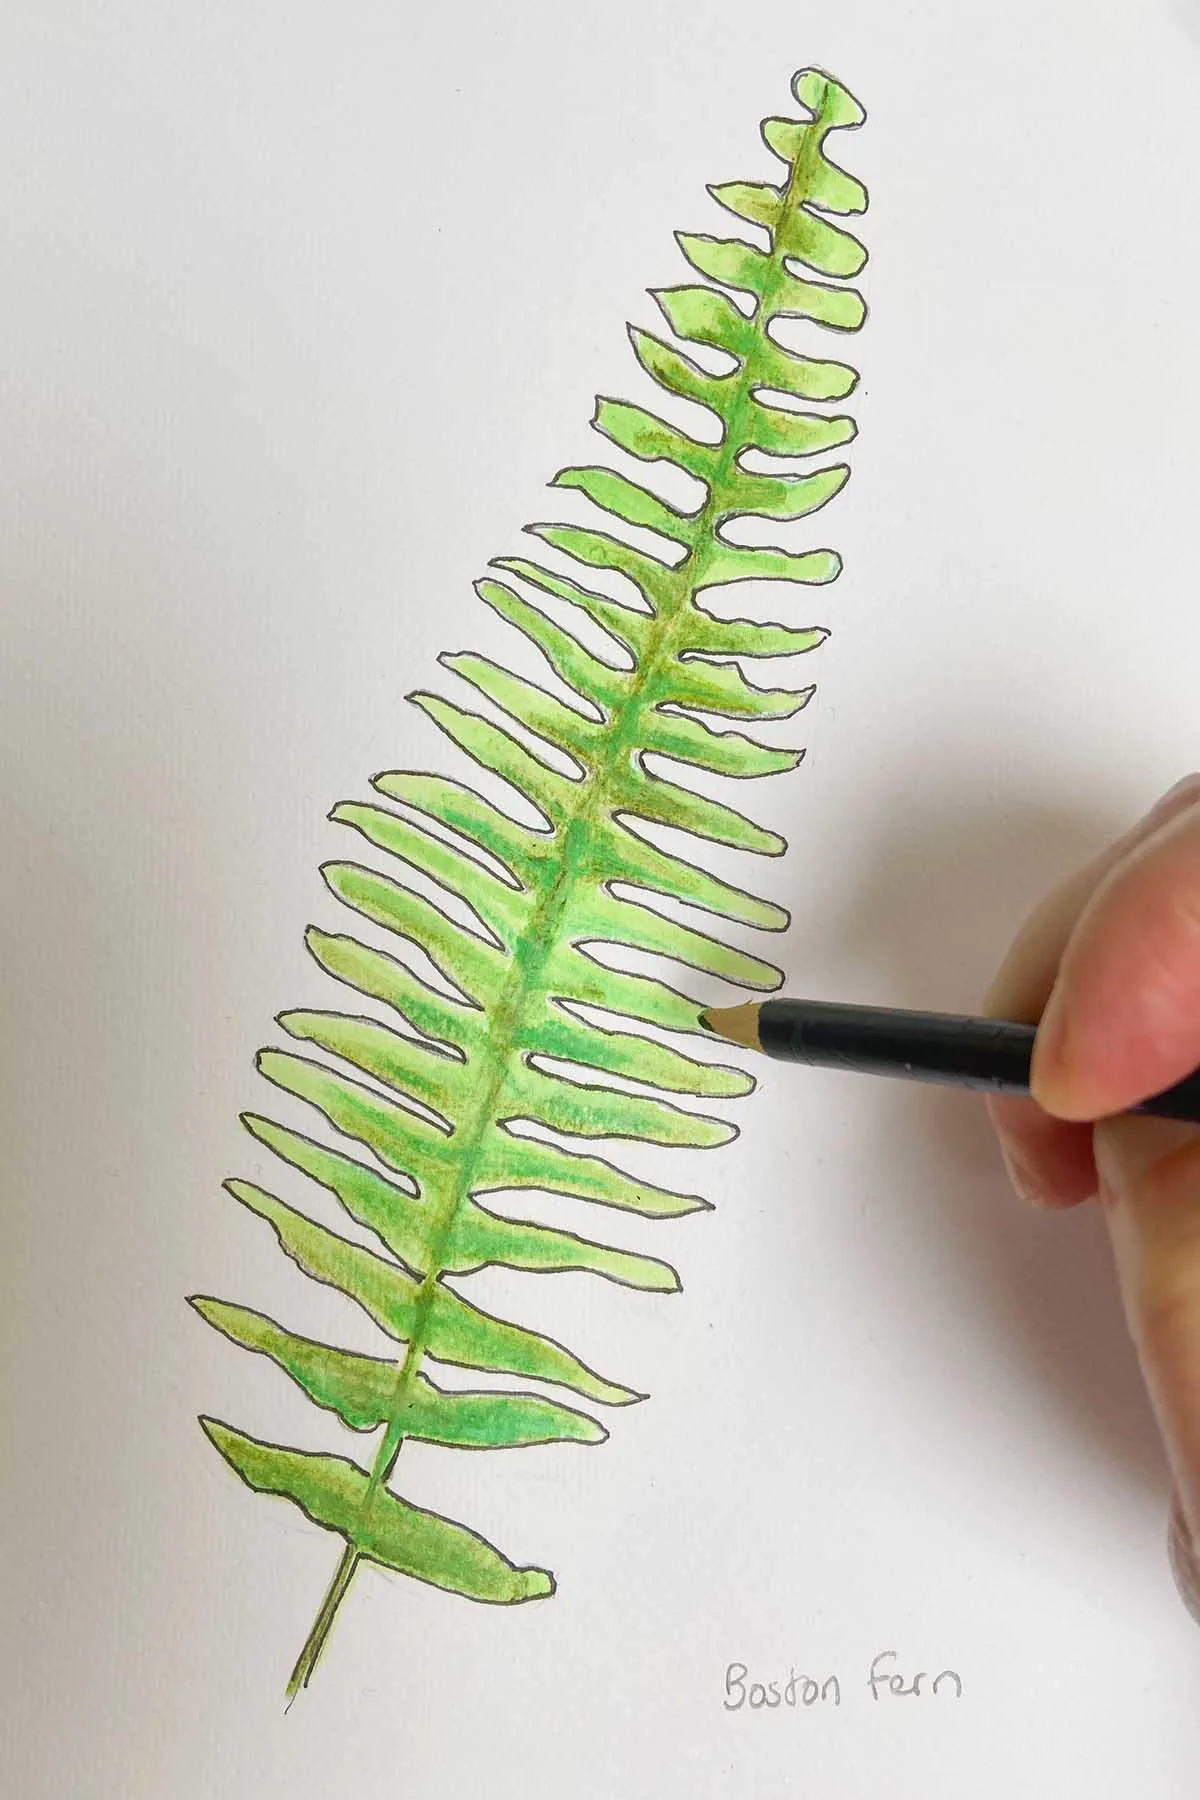
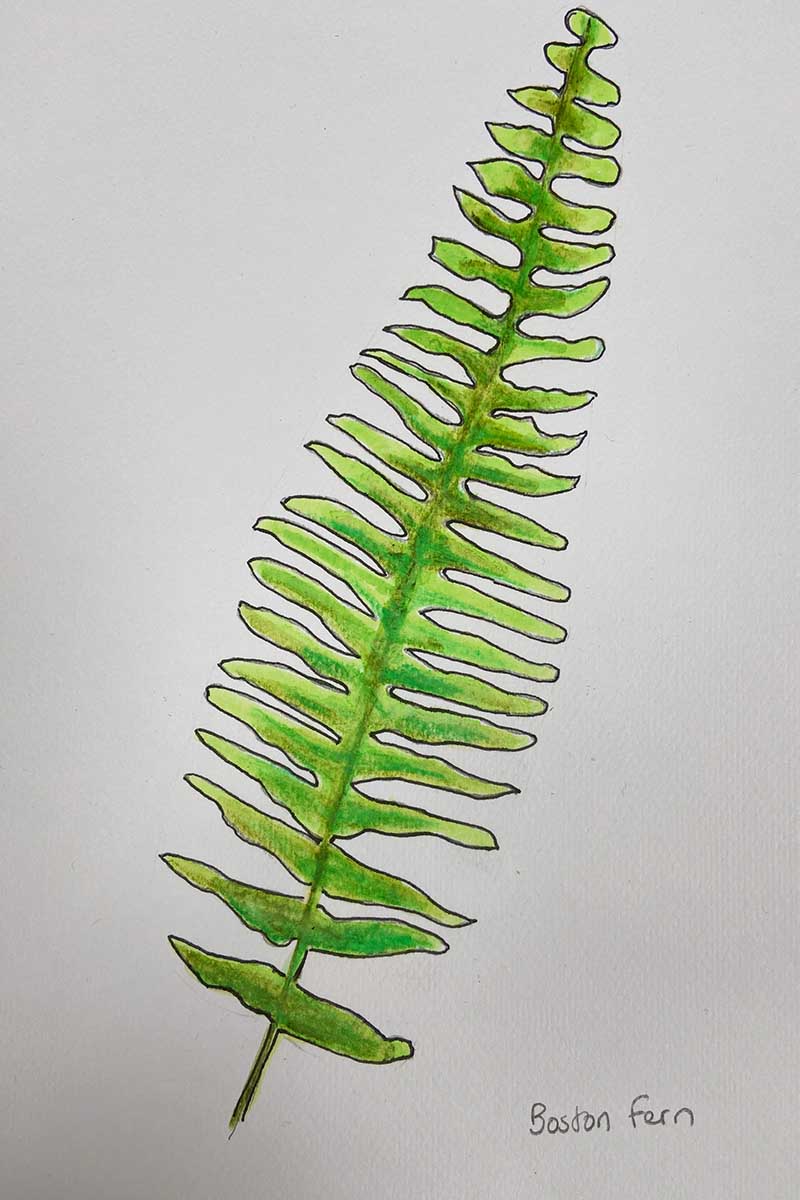
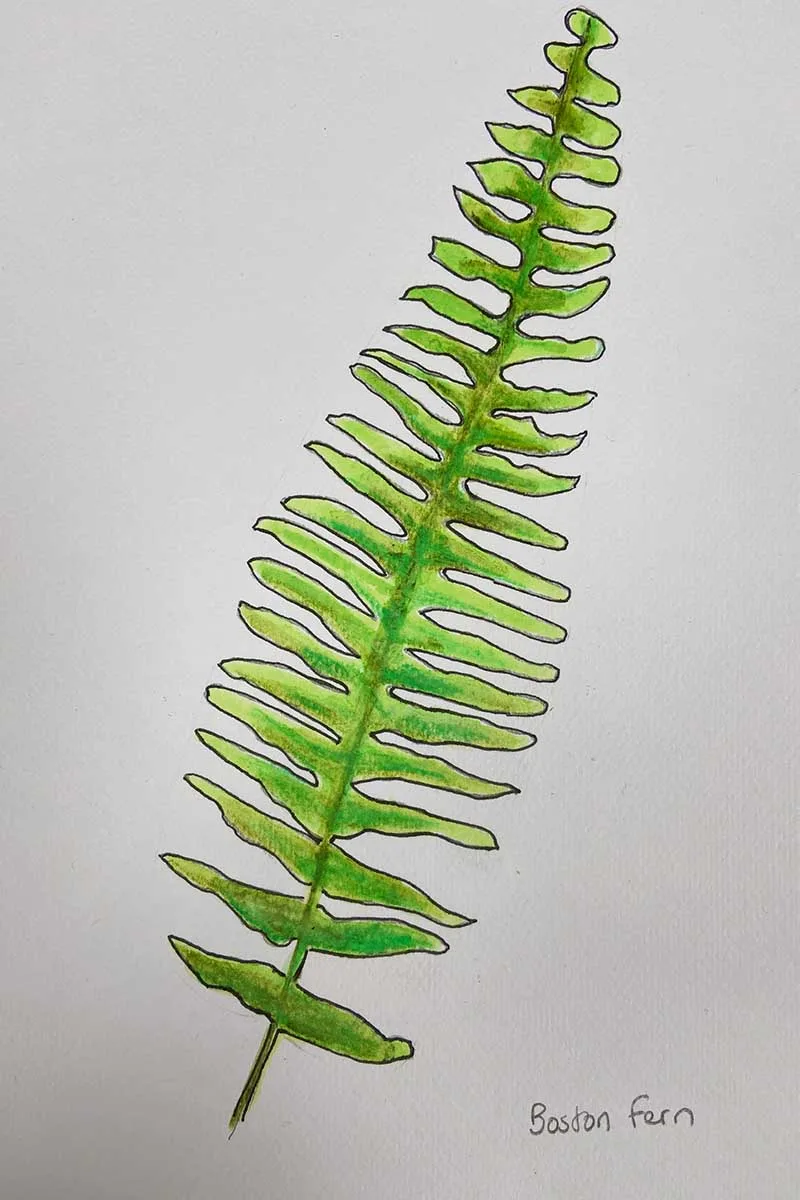
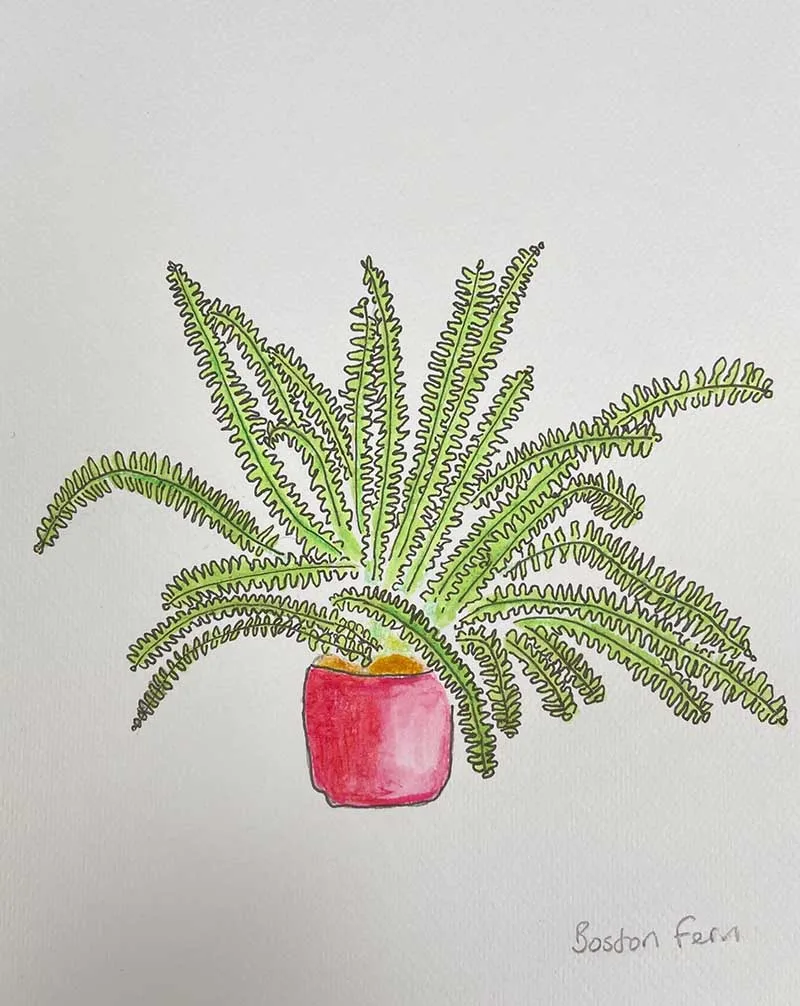
How To Draw A Boston Fern / Sword Fern
The Boston fern is a popular houseplant loved for its cascading green fronds; it is said to be a symbol of sincerity and hope, and according to old folk tales, they are a sign of fairies living nearby. This makes it a lovely subject for a hand-painted card for a friend.
Step 1: Start by outlining the shape of the frond in pencil. This is a long, narrow shape similar to a sword.


Step 2: Add the skeleton of your frond. As a Boston fern has a less divided frond (pinnately compound) than the tree fern in the previous tutorial, this can be done in one step.
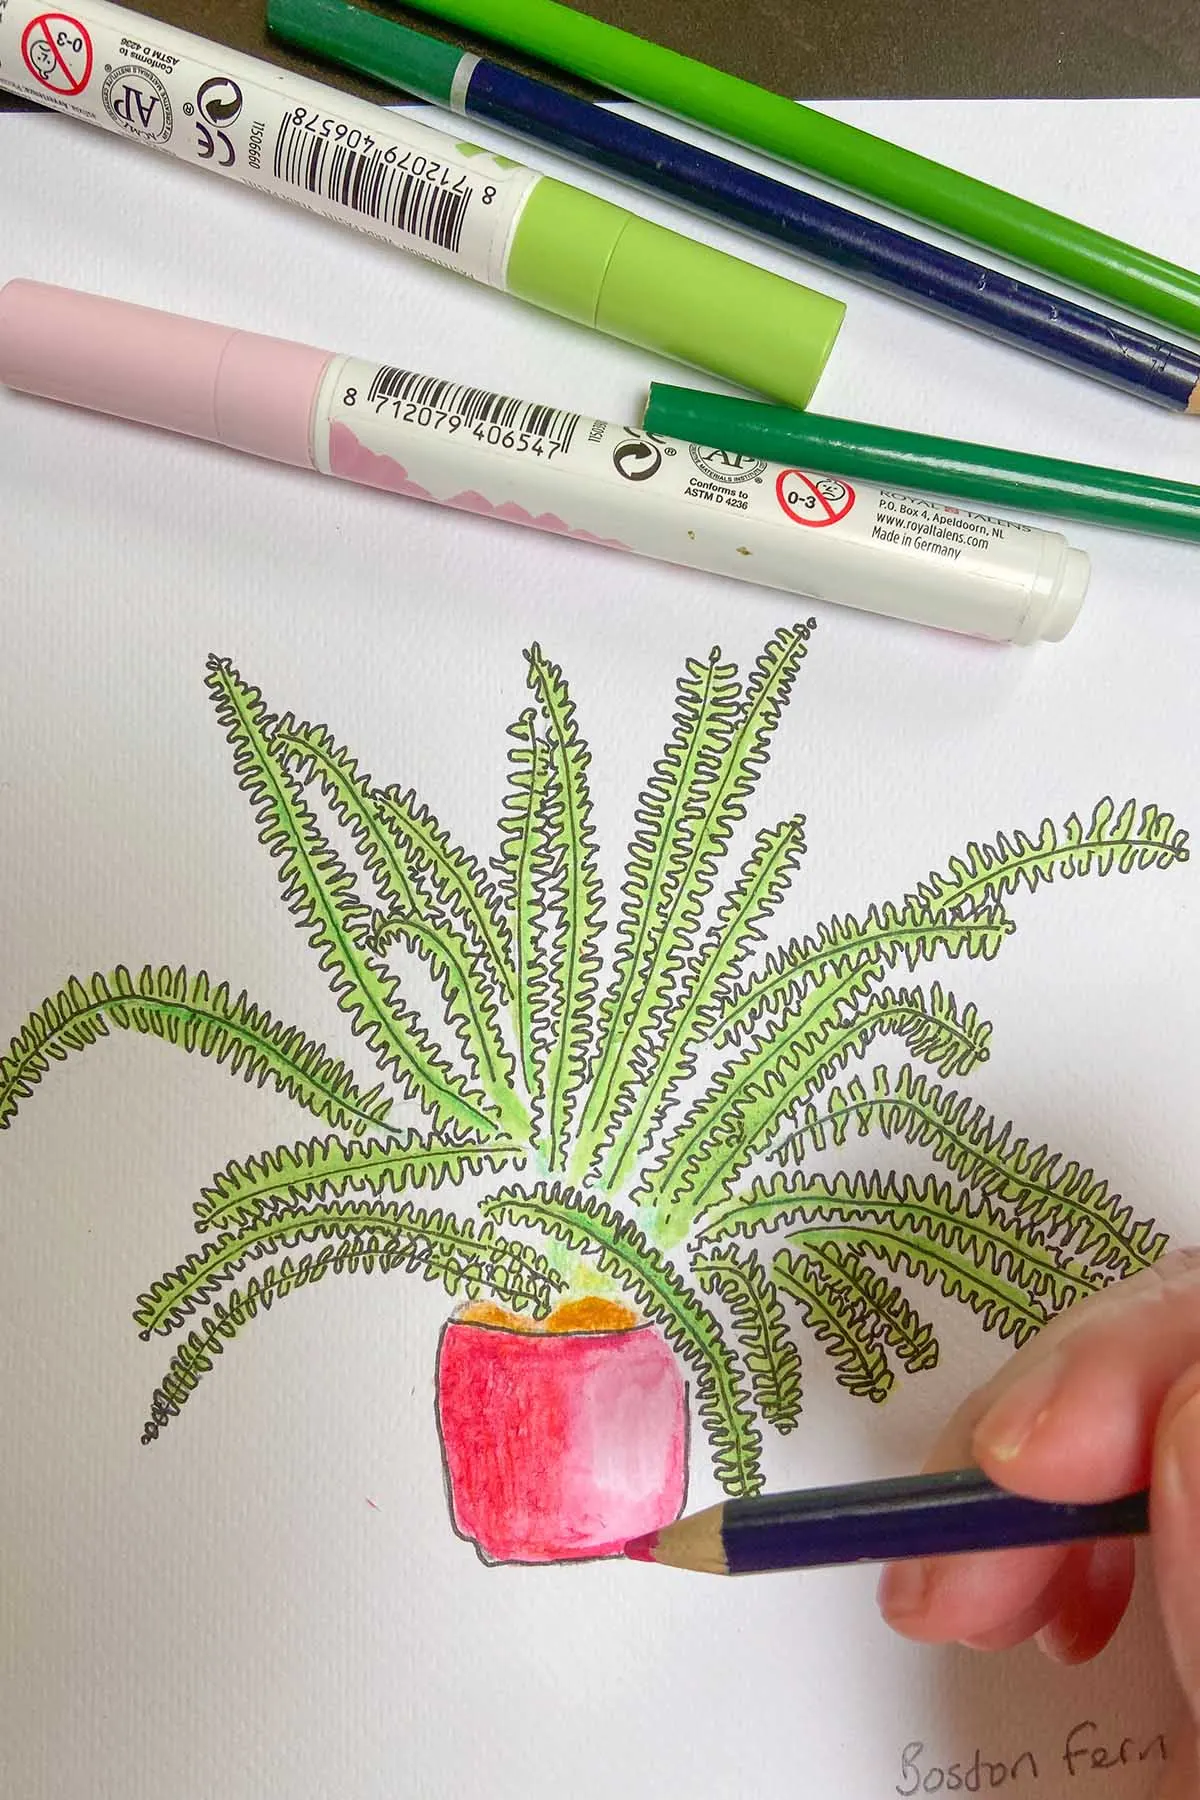
Step 3: Add colour – I used watercolour pencils in different shades of green to add some shading for depth in the centre of the front.

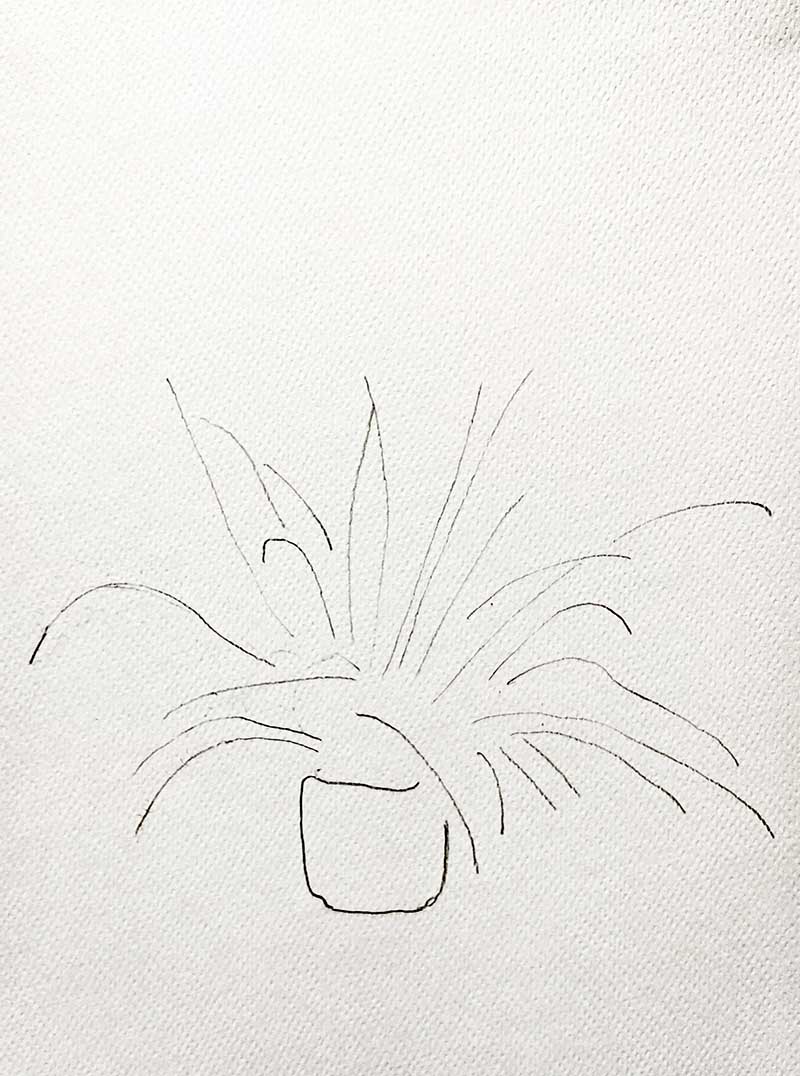
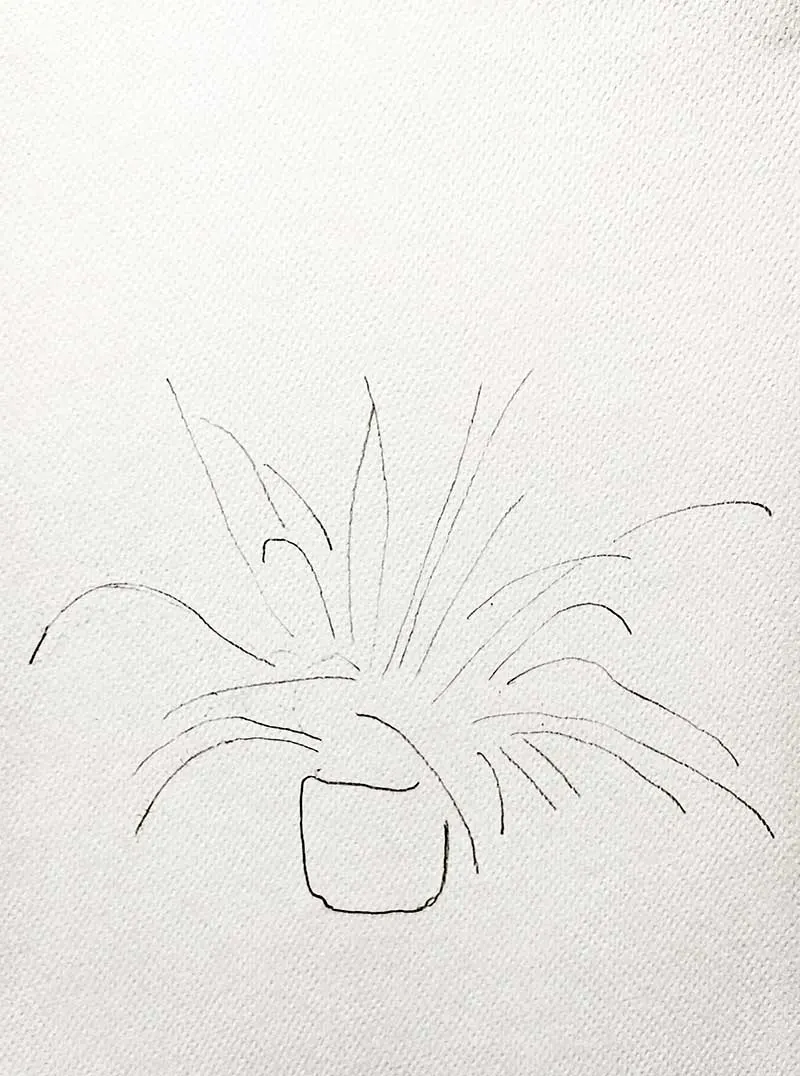
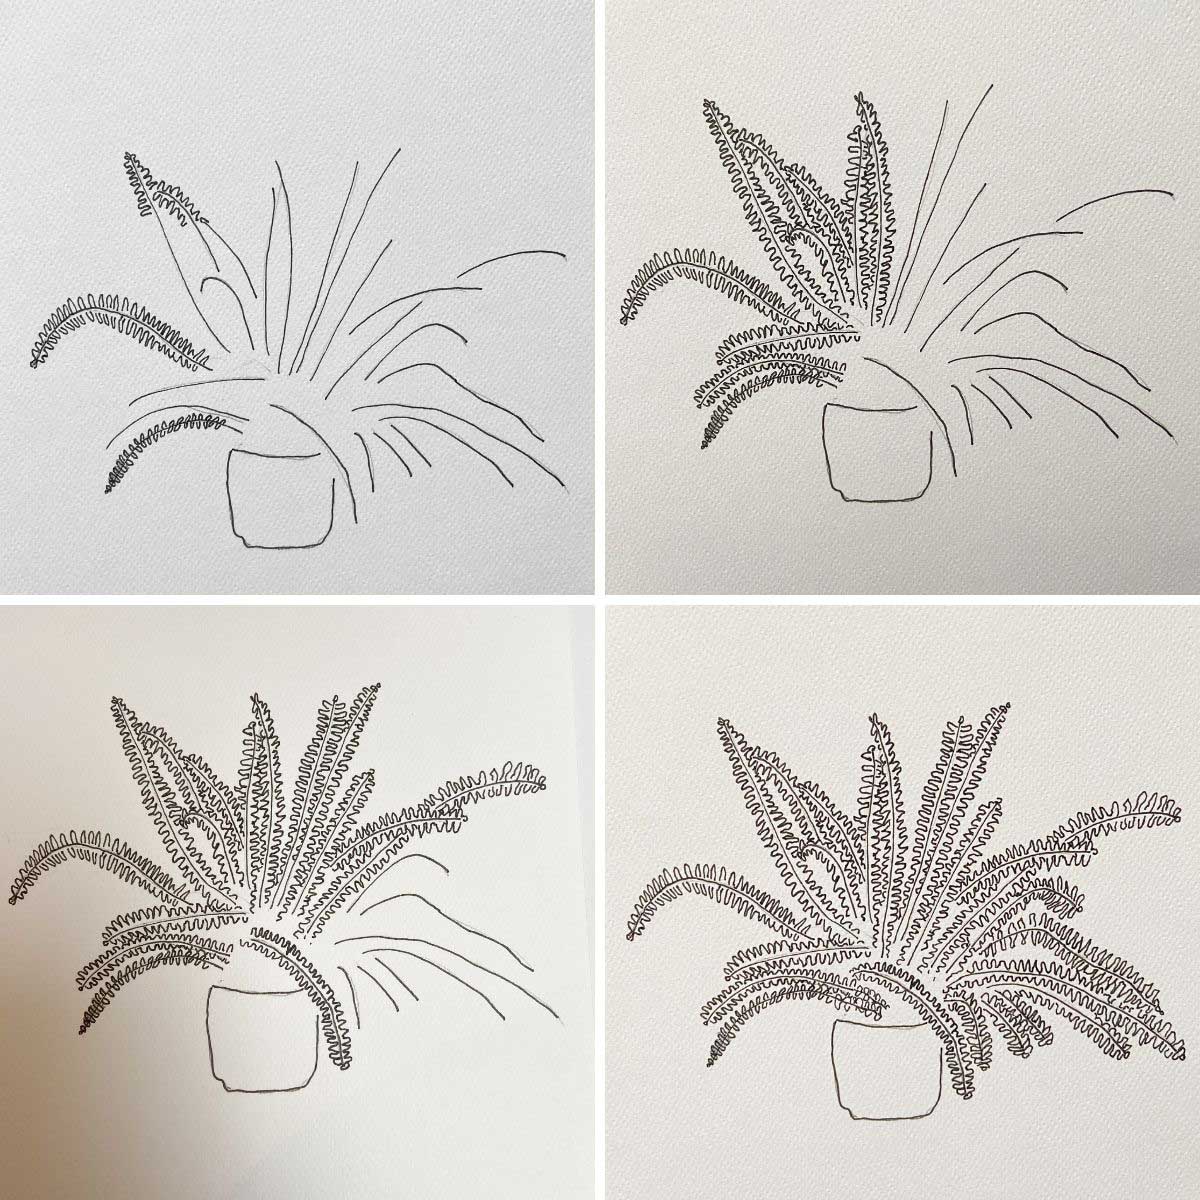
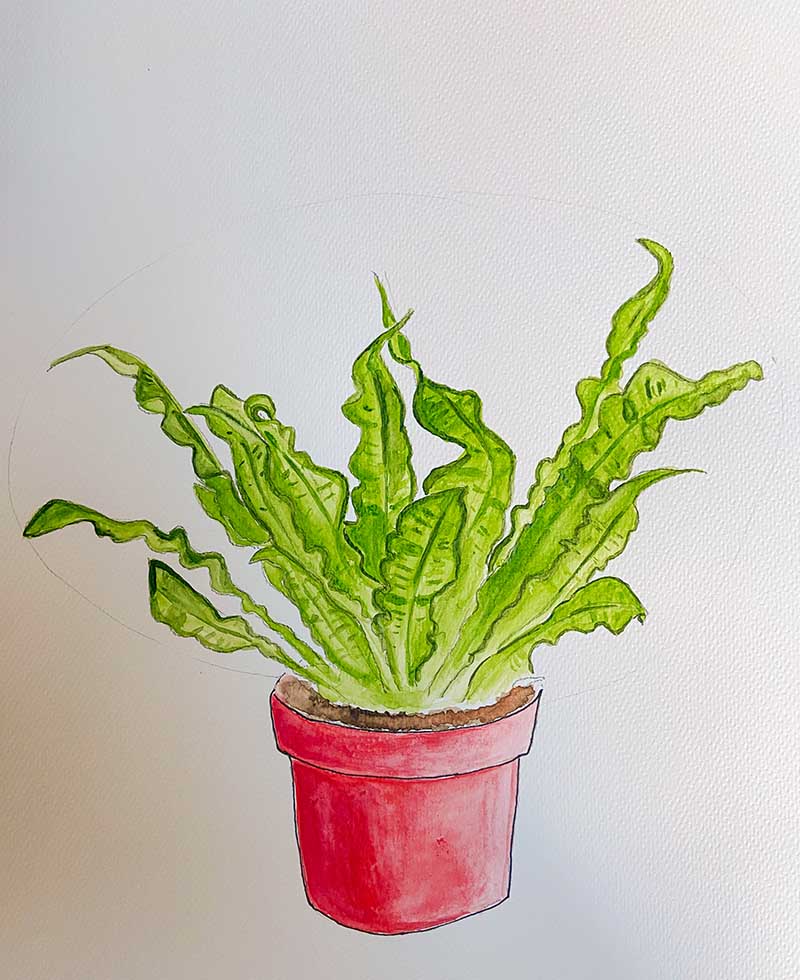
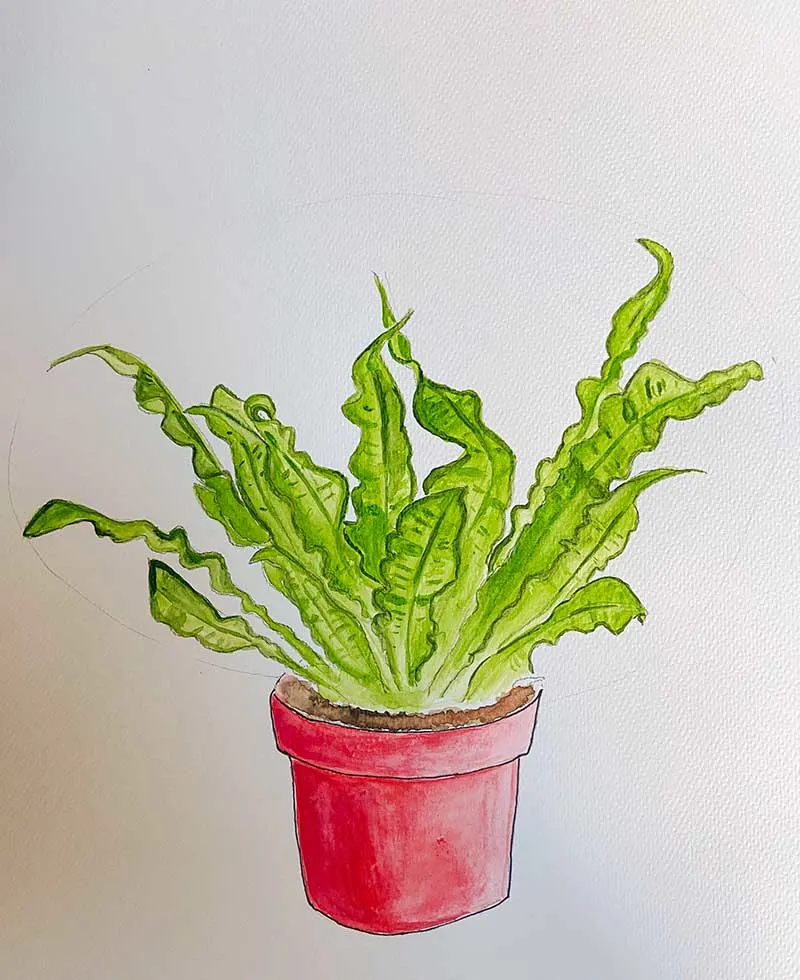
Drawing A Potted Boston Fern
The cascading fronds of a Boston fern make it a lovely subject to draw
Step 1: Sketch your pot with lines for the stems emanating from the centre in a haphazard and cascading manner.
Step 2: Add the pinna to your fronds; these small leaves come from the stems you have just drawn. As the Boston fern is more simply divided, you can build your picture up more quickly and more impressionistic. Here, I have drawn squiggly lines on either side of the stem.
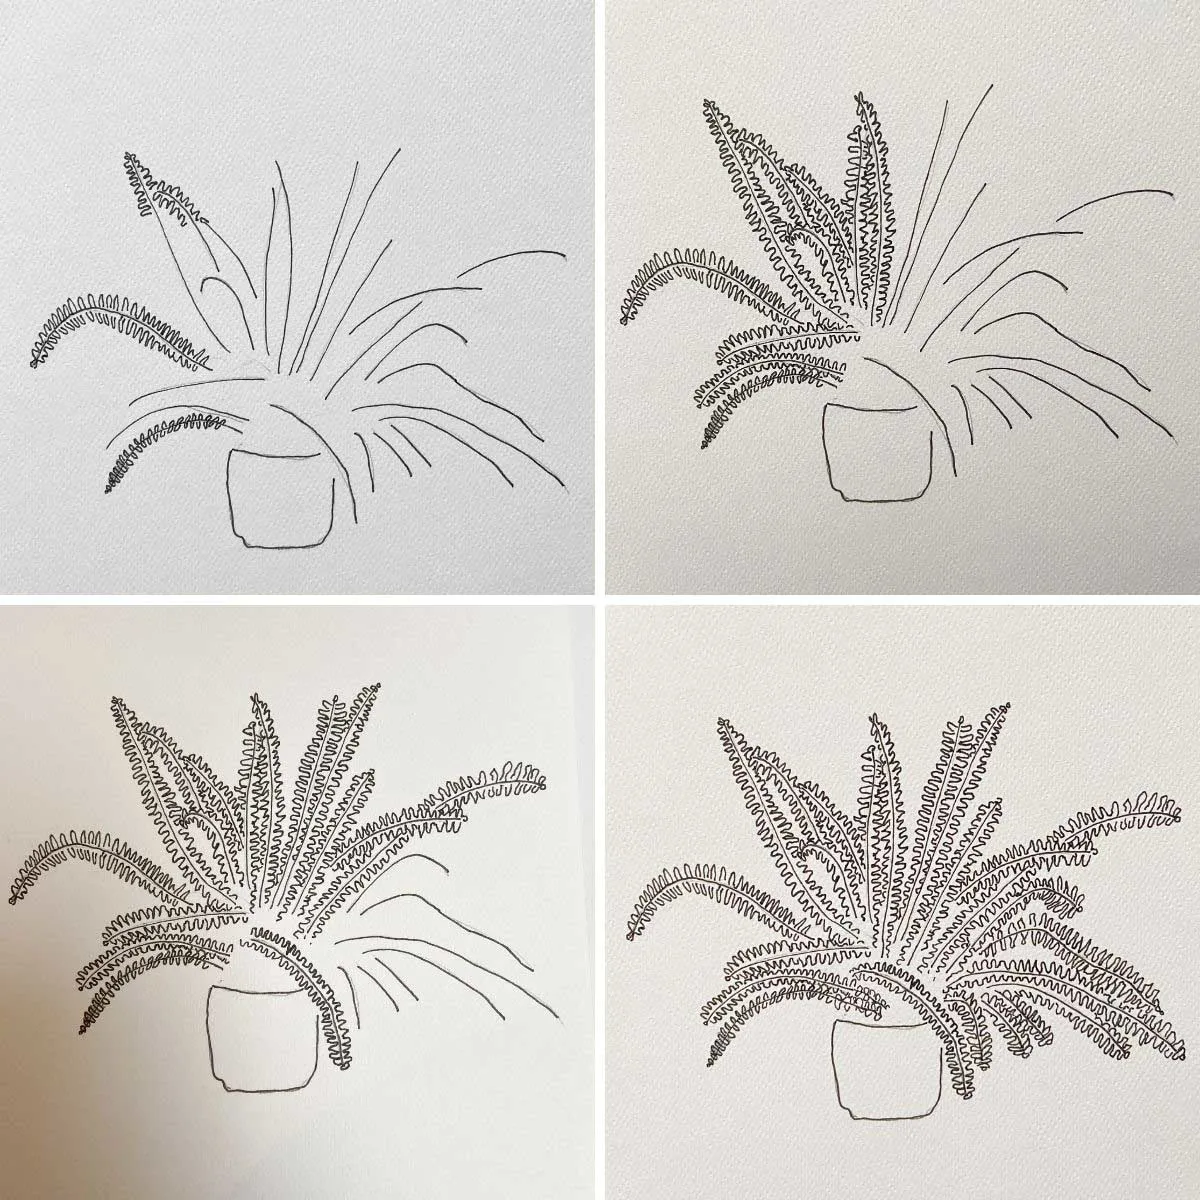
Step 3: Add colour. I used a bright green brush pen to add simple colour to the fronds and pink for the pot. The overall look and style are simple and almost cartoonish but still effective.


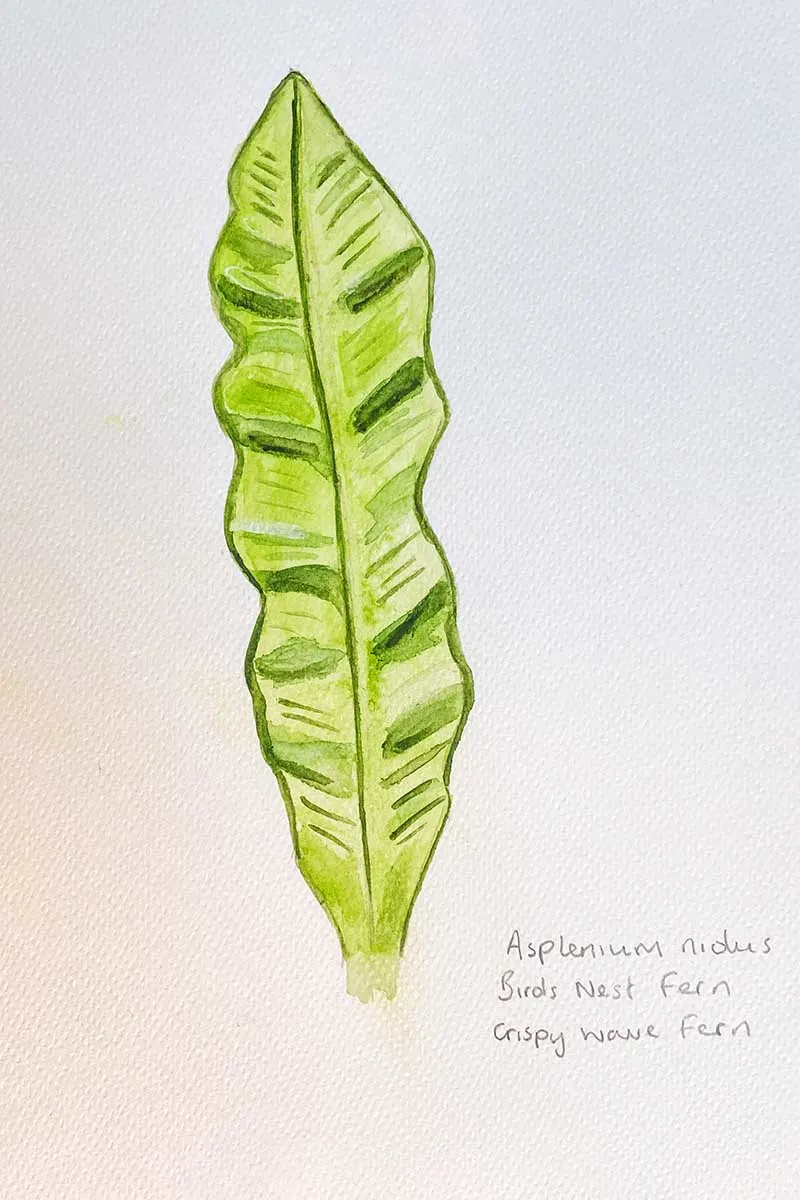
How To Draw Birds Nest Fern Fronds
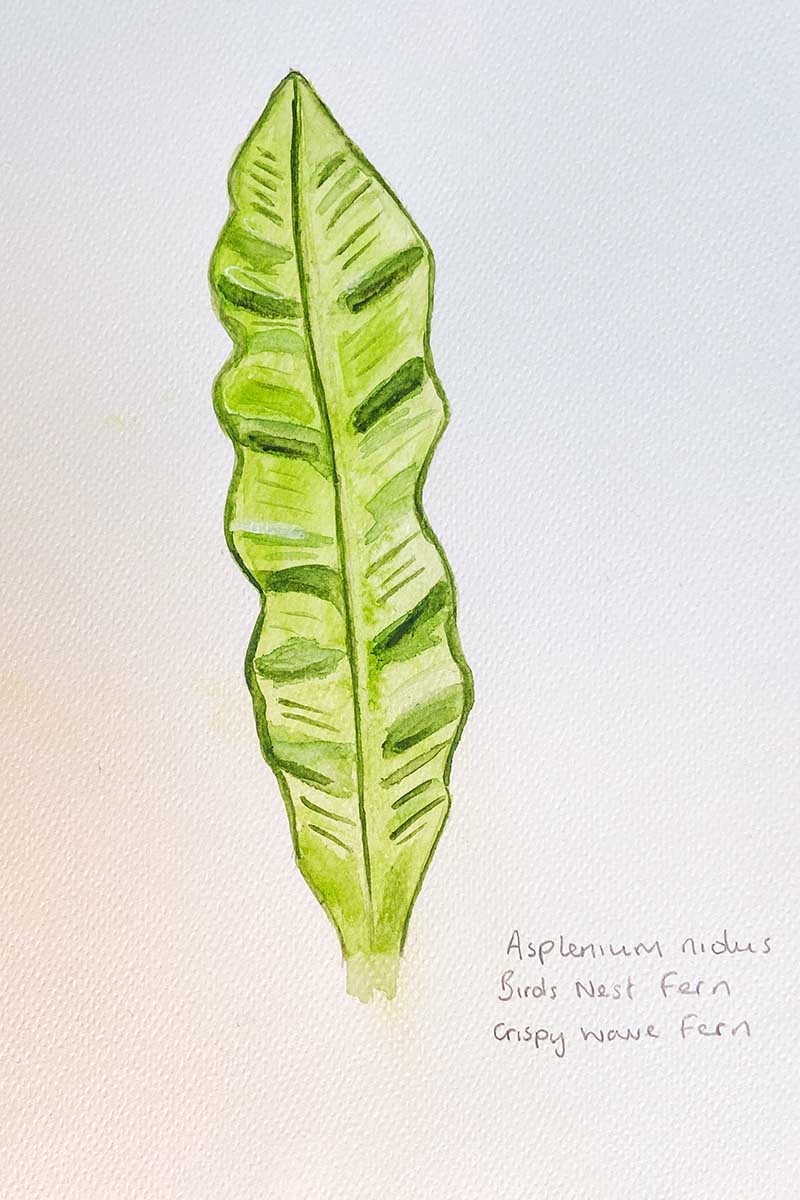
Asplenium nidus, or Bird’s nest fern, is native to tropical Southeast Asia, Hawaii, Polynesia, India and eastern Africa. The large, simple, and undivided fronds resemble banana leaves.
People in Taiwan enjoy the young fronds as a mountain vegetable, stir-frying or boiling them, while in Polynesia, they cook them with coconut cream. They also use the large fronds to wrap and cook many dishes, similar to how banana leaves are used.
The Birds Nest fern has a simple, undivided frond with a wavy edge. Cultivators have developed a variety with an exaggerated wave, known as the Crispy Wave Birds Nest fern.
Both varieties are epiphytic ferns attached to other natural plants. This resemblance to nests in trees in their native habitat might be the reason behind the name Birds Nest Ferns.
They also make fantastic houseplants, as they are long-living, easy to care for and non-toxic, making them pet-friendly. Plus, they look great!
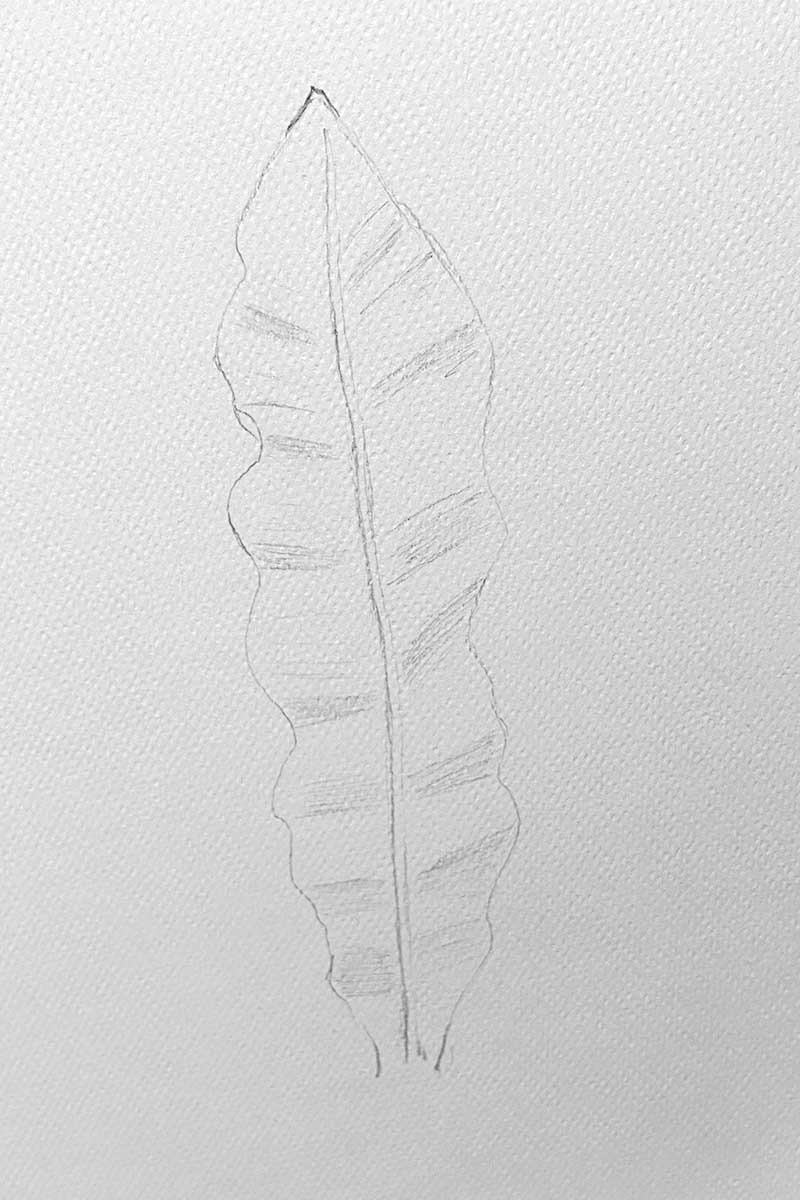
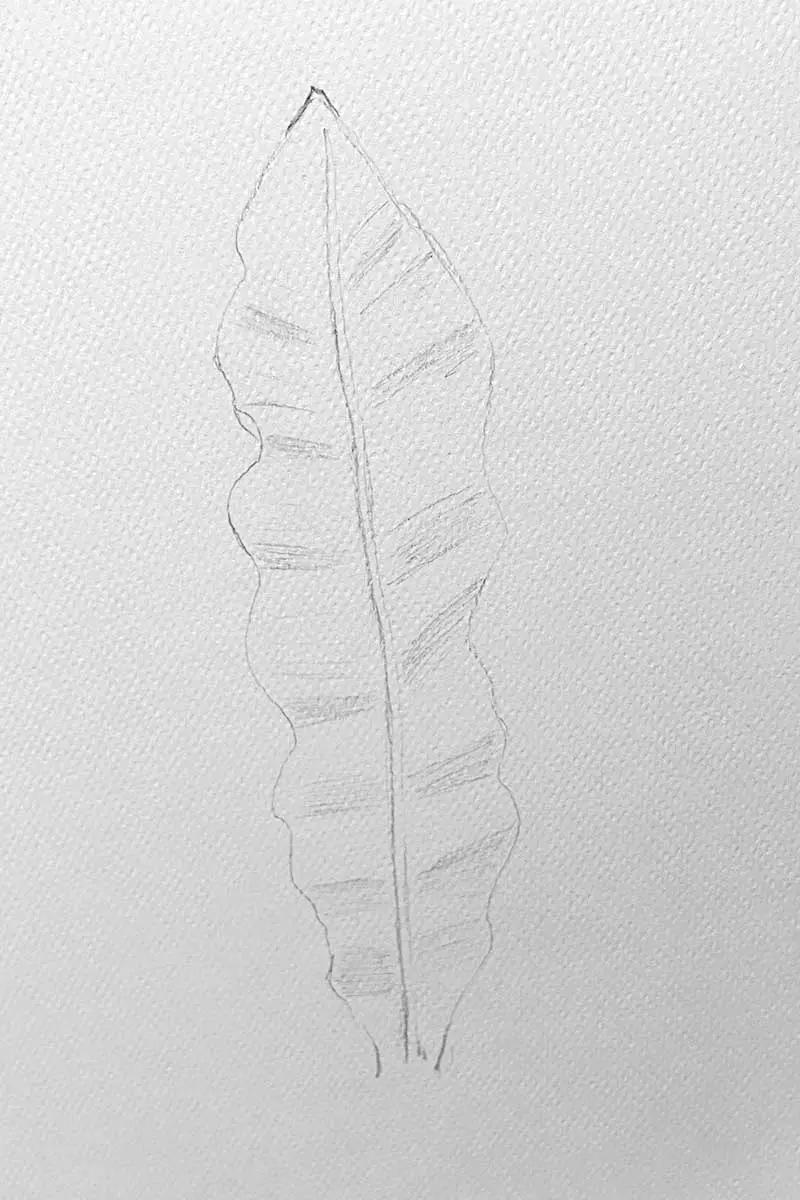
Step 1: Drawing the frond of an undivided fern such as this Birds Nest fern presents different challenges to the previous tutorials as the frond is undivided you can draw the narrow wavy sword shape outline in one go. The challenge is in bringing texture to the frond. At this stage, to aid you later when applying colour, in pencil, lightly shade areas of the frond in lines from the stem to add definition and realism.
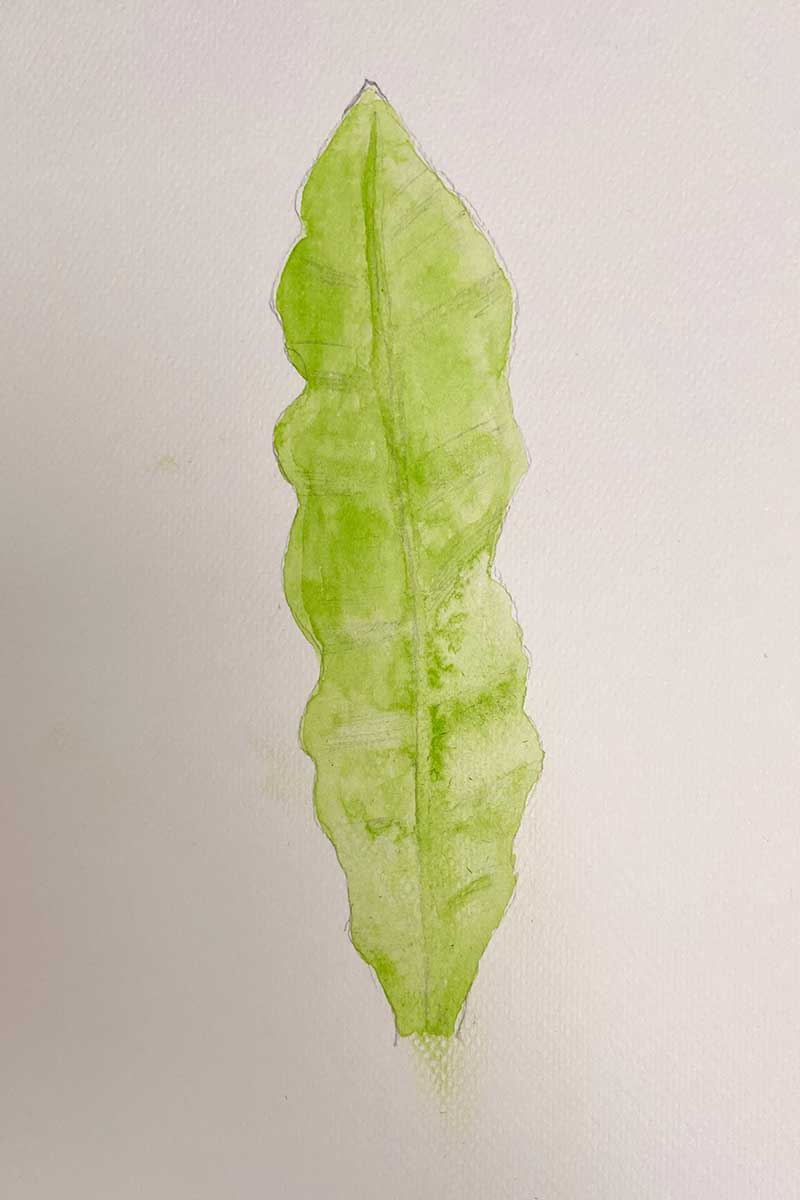
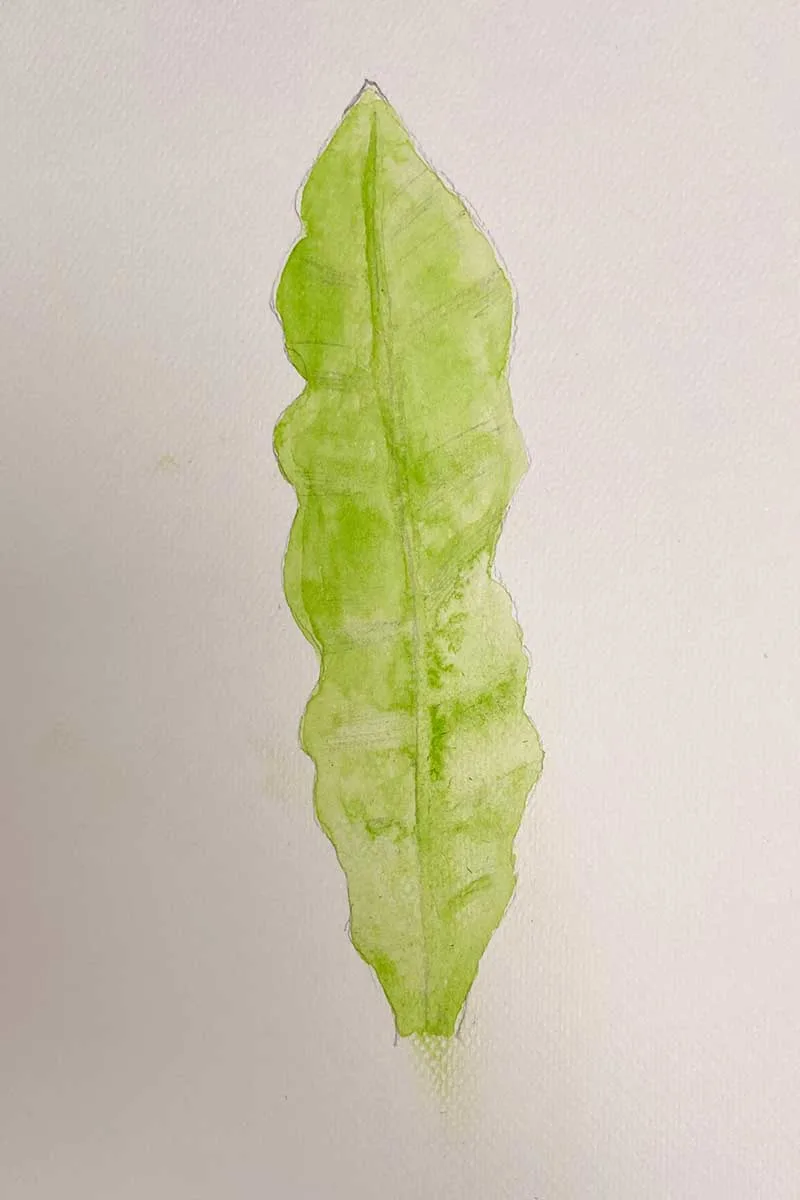
Step 2: I have decided that watercolour will be the most effective way to add colour to the frond, so I have done a light green wash.
Step 3: Using watercolours, I add darker shades of green to my frond in the areas I previously shaded in pencil. These darker areas help make the image more realistic. You can see the resemblance to a banana leaf, and you could probably use the same technique when painting a banana leaf.
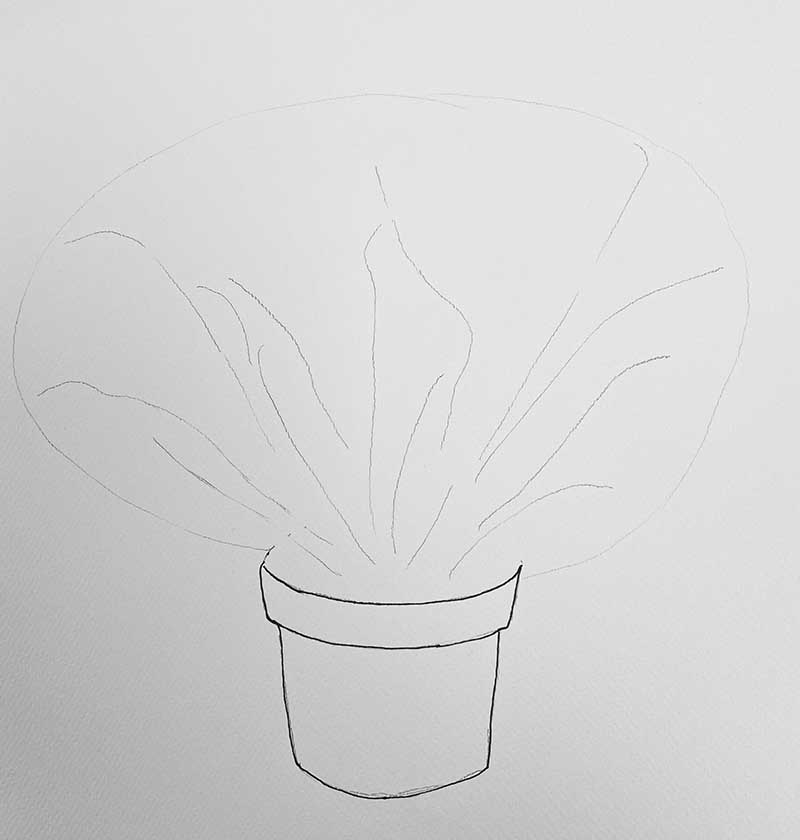
Drawing A Potted Bird’s Nest Fern
Step 1: Draw your pot, and from your pot, draw wavy upward lines. These will be the stems of your Crispy Wave Fern.

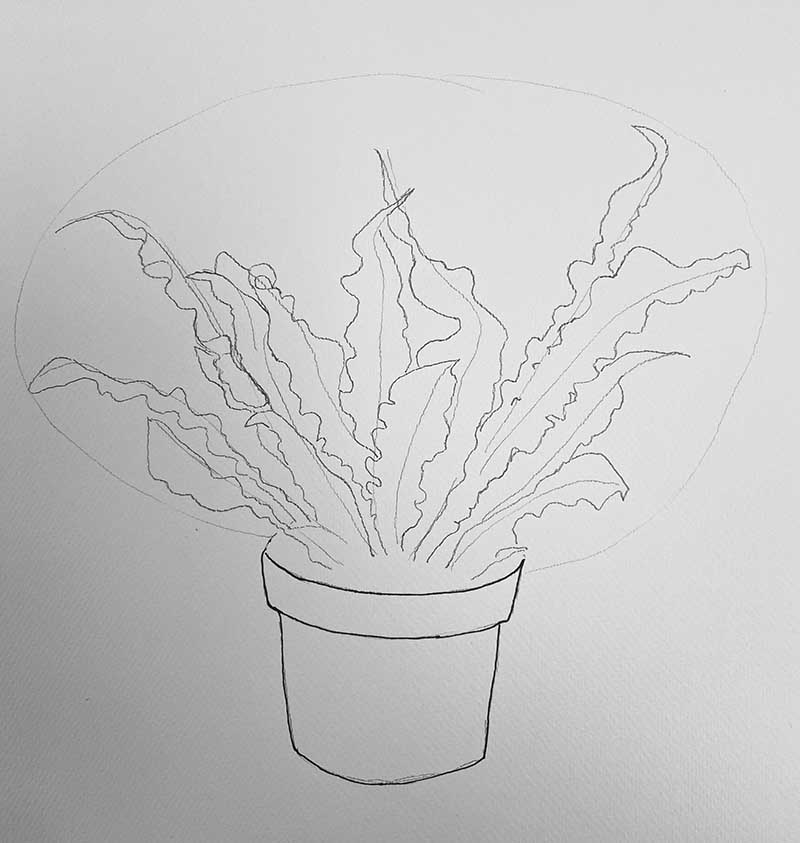
Step 2: Add the shape of your fronds to the lines (central stems) you have just drawn. Go as wavy as you like and experiment with creating twisting shapes for the fronds as you imagine them twisting in all directions.

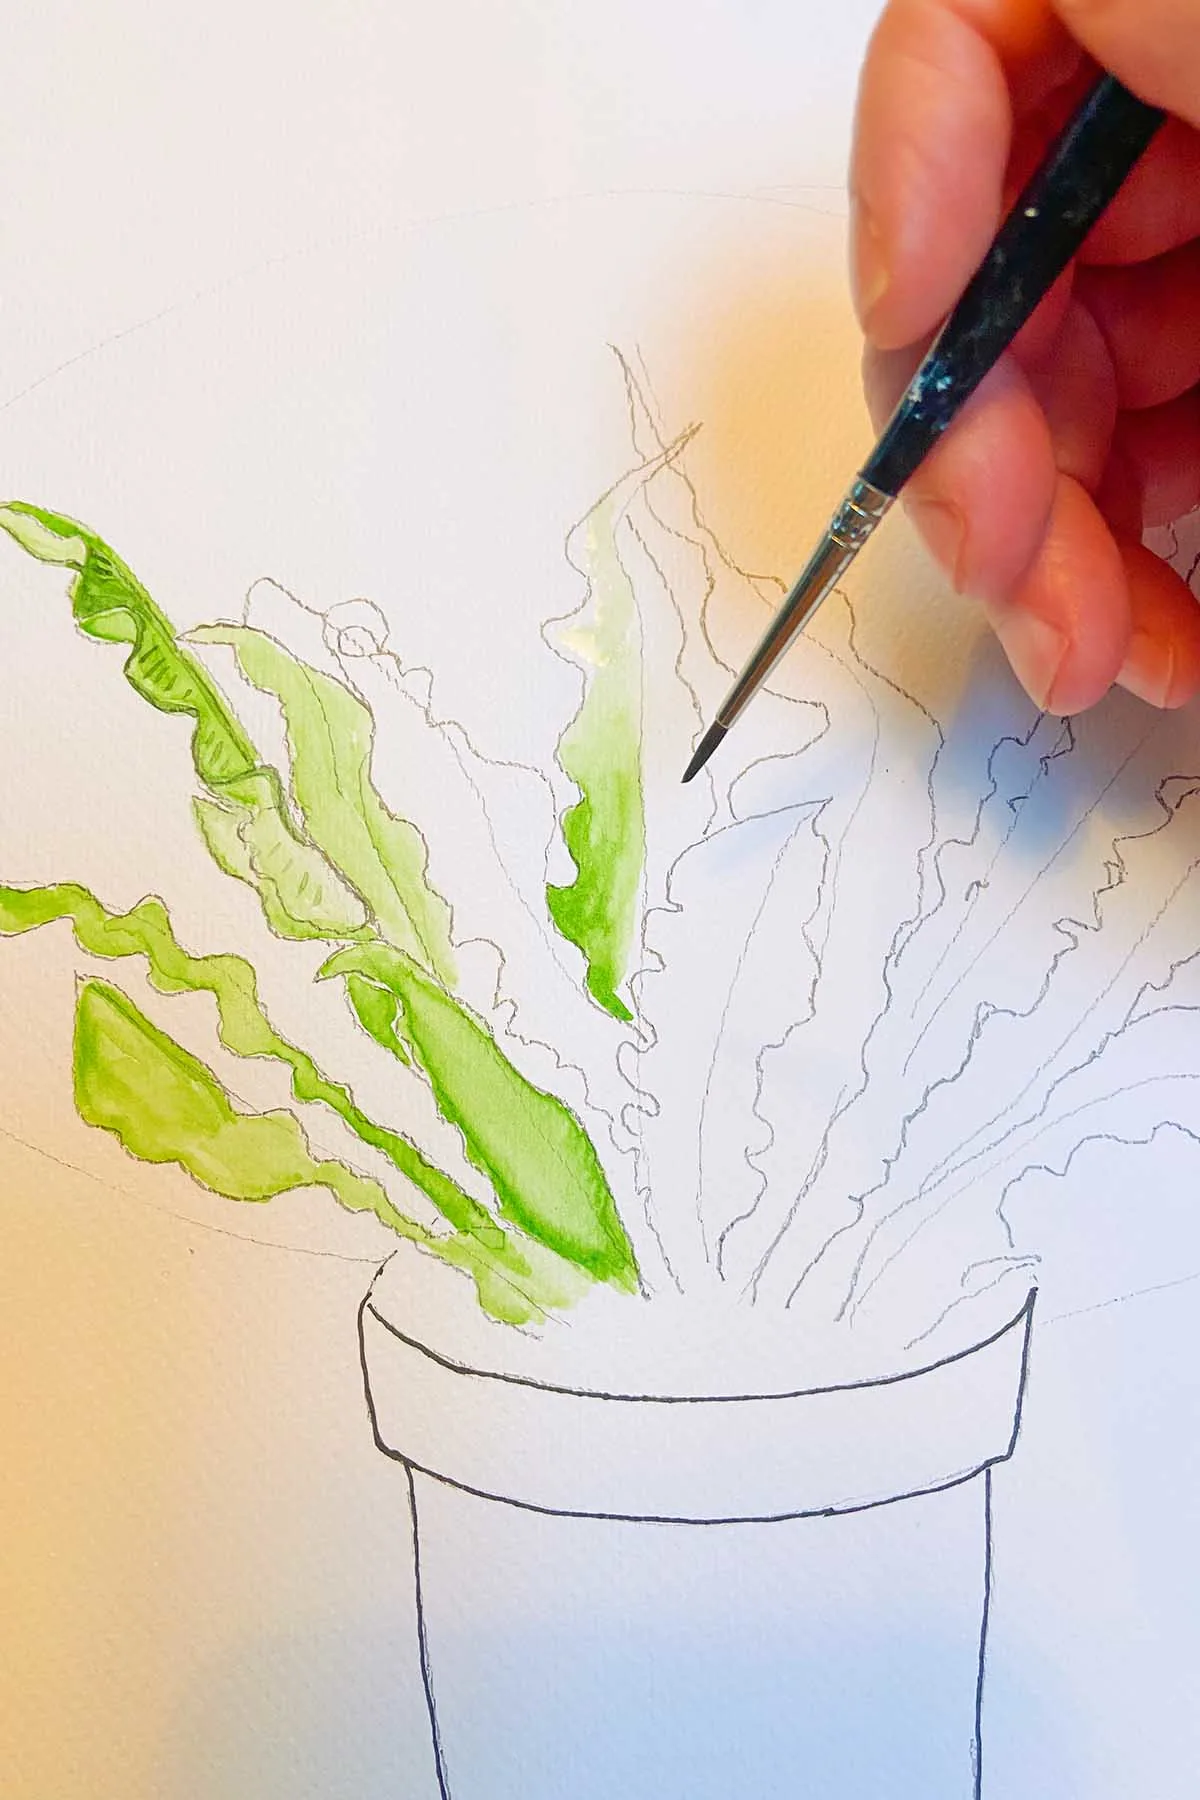
Step 3: Add colour. As in the tutorial for the singular frond above I have decided to use the same technique of a light green wash in watercolour then building up the image in darker shades of green to add depth and shadow. I find it relaxing when using watercolours in this way, and if I feel I have made an error, I quickly add water to dilute it, but I think the imperfections are part of the charm of using watercolours.

Conclusion and Other Related Posts
In conclusion, the diverse world of ferns provides a wealth of inspiration for artists. Whether capturing the complex patterns of a tree fern or the smooth lines of a Birds Nest fern, drawing and painting these plants challenges us to appreciate and replicate their natural beauty.
For beginners and seasoned artists, ferns offer endless opportunities to refine techniques and explore the intricate details of the natural world. So, let the varied and elegant ferns motivate you to pick up your drawing tools and create your interpretations of these fascinating plants.
For even more examples of leaf plants, check out these drawings of tropical house plants and antique botanical leaf prints.
There are more botancial drawing tutorials on the site to try, these include:

If you fancy, you can Buy Me A Coffee Here.
Jennifer
Tuesday 12th of March 2024
Gorgeous. Thanks for sharing this post at the Will Blog for Comments #29 linkup. Hope to see you next time, too.
claire
Tuesday 12th of March 2024
Thank you so much, and thanks for the invite.
Amy Johnson
Tuesday 12th of March 2024
Wow! What a great tutorial. You made it look so simple. I'm pinning for future use. Thanks so much. Visiting from "Will Blog for Comments"
claire
Tuesday 12th of March 2024
Ferns are fun to draw if a little tricky, but I hope I've broken it down into simple stages.
Pam
Thursday 7th of March 2024
What great tutorials! I love ferns, and your step-by-step instructions are wonderful! I'll be featuring this post at Thursday Favorite Things tomorrow. :) Pam anartfulmom.com
claire
Thursday 7th of March 2024
Thank you so much; that is lovely to hear. I'm looking forward to seeing the feature.
Joanne
Friday 1st of March 2024
These are all lovely works of art and your instructions are quite simple to follow. Thank you!
claire
Friday 1st of March 2024
Thank you so much; that is lovely to hear!
Jennifer
Friday 1st of March 2024
I am entirely in love with ferns. They seem so hard to draw, but you've broken it down so nicely! What gorgeous results. So beautiful. Thanks for sharing this post at the Will Blog for Comments #27 linkup. Hope to see you there next time, too. Have a great weekend.
claire
Friday 1st of March 2024
Thank you. They are a little harder to draw than other plants, but the results are well worth it!